Sharing Our Passion for Technology
& Continuous Learning

Prerequisites
This article builds on the prior article: CloudFormation.
Continuous building via AWS CodePipeline
Not only are we going to manage our application environments with Cloudformation{:target="_blank"} but we are also going to manage our deployment pipeline in the same manner. CodePipeline (Not to be confused with CodeDeploy{:target="_blank"}) is the Continuous Integration and Continuous Deployment (CI/CD) offering from AWS. There are a lot of options to handle CI/CD responsibilities but we prefer CodePipeline because all it requires is an AWS account to get started so we don't have to worry about integrating with other tools.
Start by creating a simple pipeline.template.yml file with the following content:
AWSTemplateFormatVersion: '2010-09-09'
Description: Pipeline for Product Service
Parameters:
  RepoToken:
    Type: String
    NoEcho: true
    Description: OAuth Token for the github repository
Resources:
  ArtifactStorage:
    Type: 'AWS::S3::Bucket'
Before executing the above template, log into your GitHub{:target="_blank"} account and go to Settings -> Developer Settings -> Personal Access Tokens and select "Generate new token" to create a personal access token.
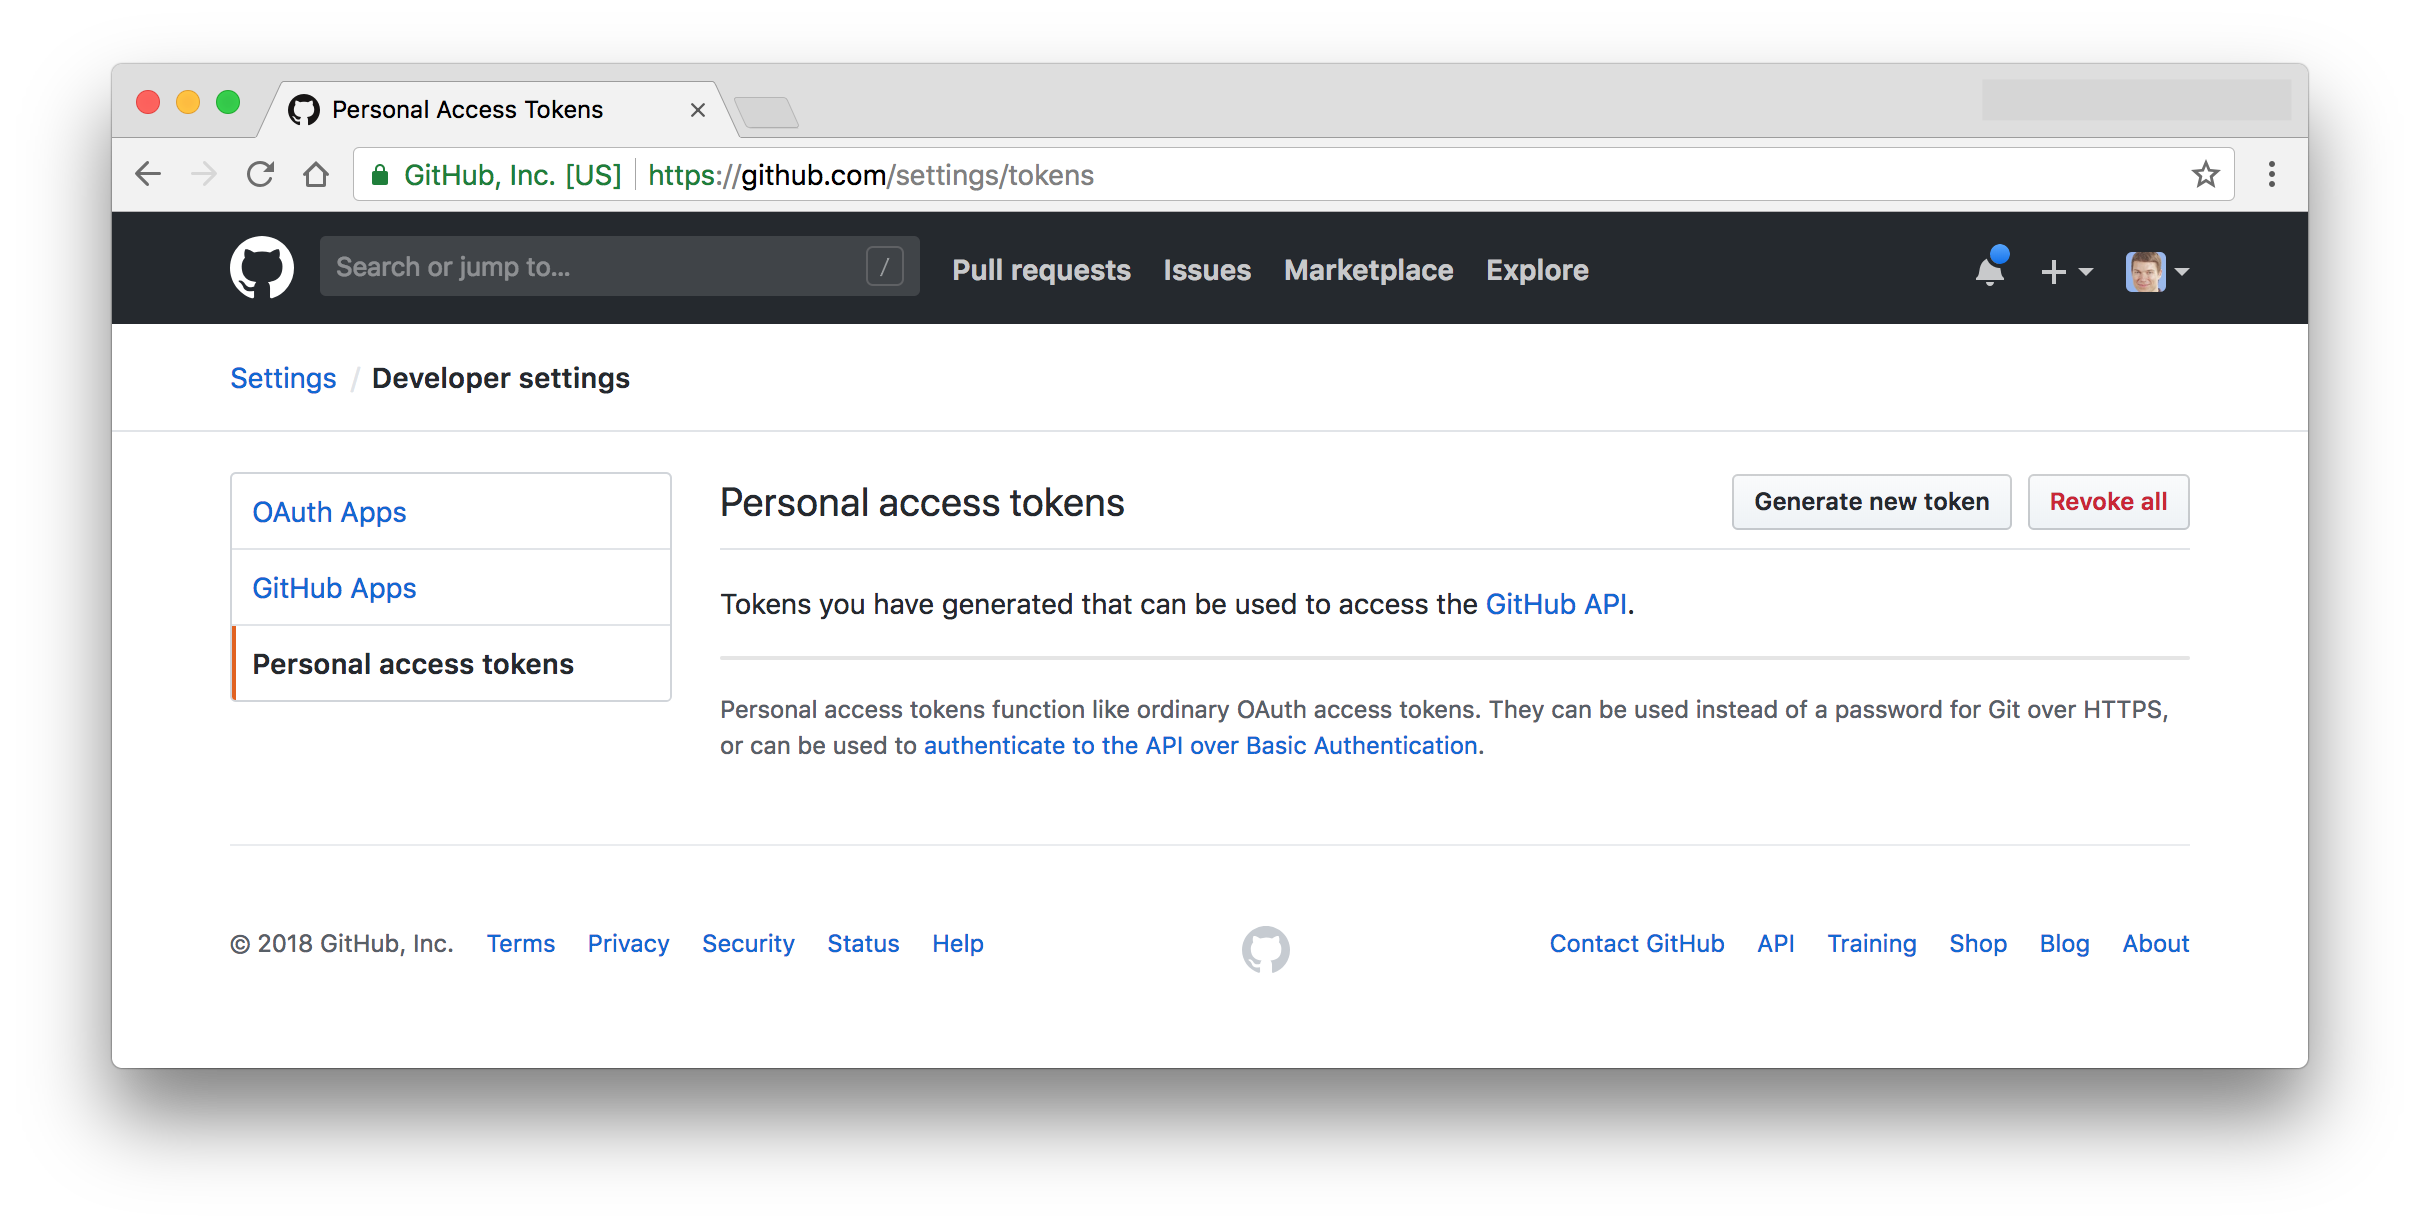
You will need to check all the Repo and admin:Repo- scopes.
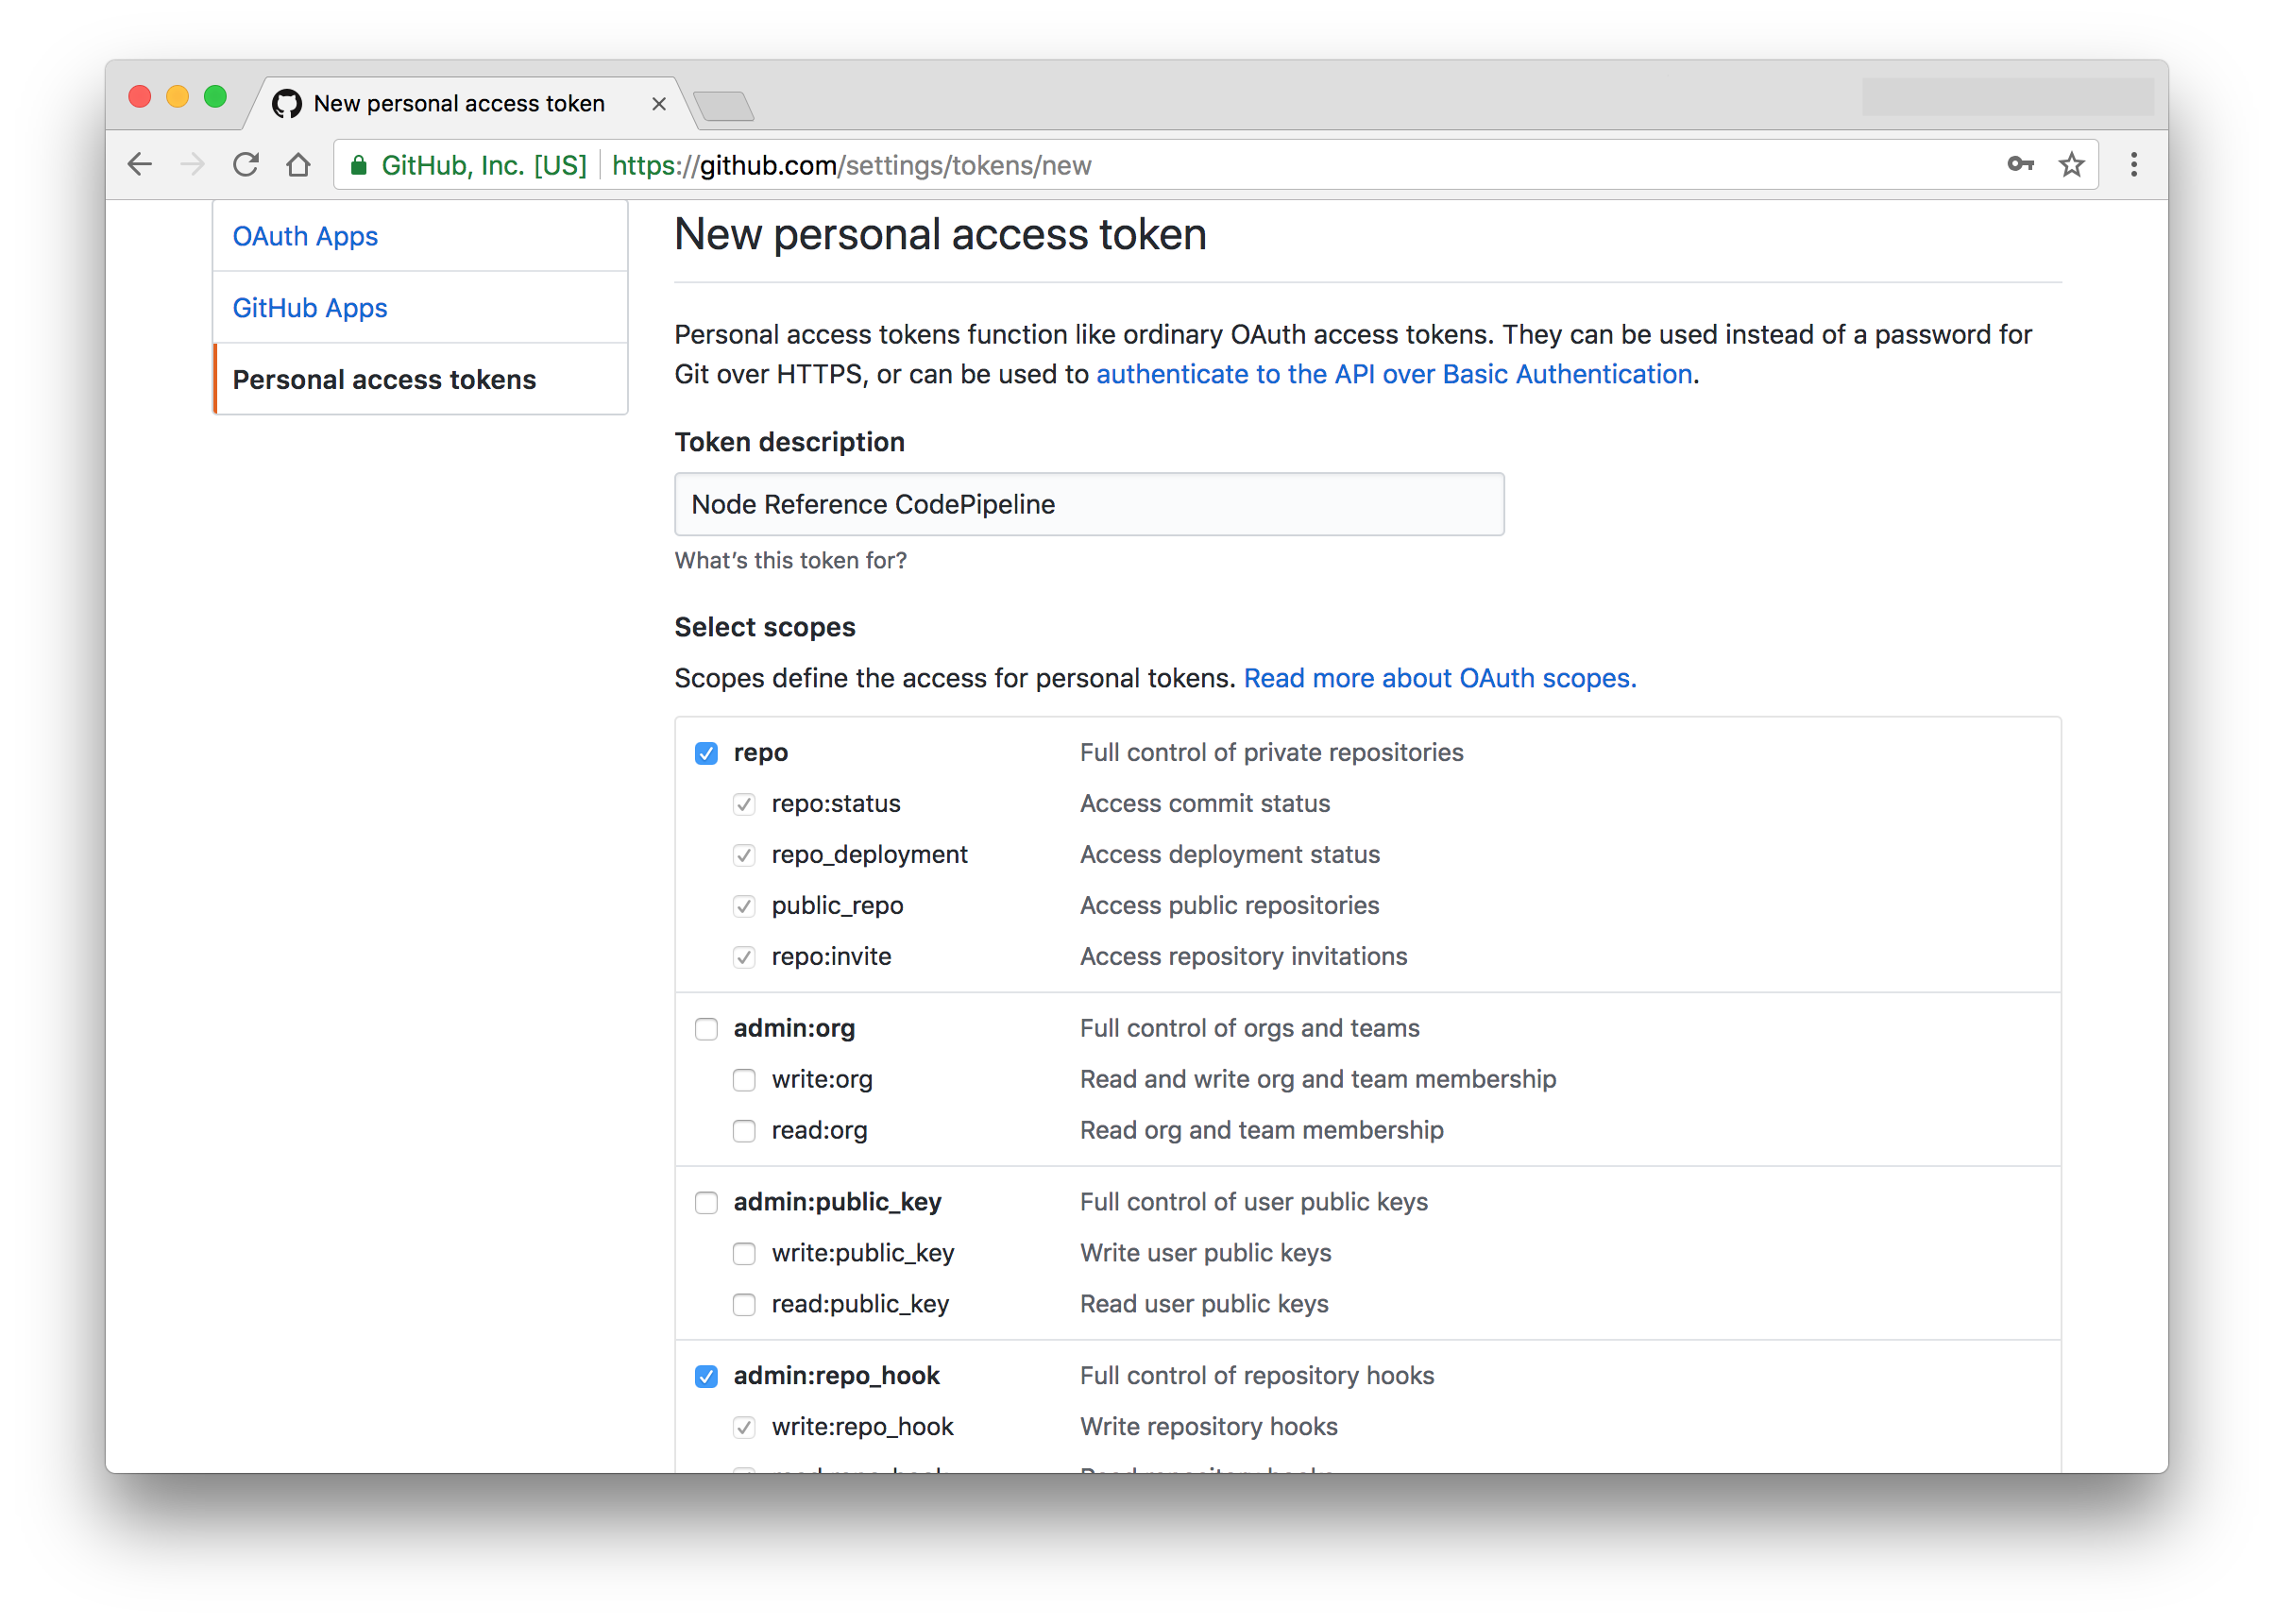
Save this token in a safe place for now (Do not check it into version control). We will need it in the next step.
Install Python{:target="_blank"}, pip{:target="_blank"} and the AWS CLI{:target="_blank"}.
curl https://bootstrap.pypa.io/get-pip.py -o get-pip.py
python get-pip.py
pip install awscli
Then configure the AWS CLI{:target="_blank"}:
$ aws configure
AWS Access Key ID [None]: AKIAIOSFODNN7EXAMPLE
AWS Secret Access Key [None]: wJalrXUtnFEMI/K7MDENG/bPxRfiCYEXAMPLEKEY
Default region name [None]: us-west-2
Default output format [None]: ENTER
Then deploy the stack by running the following command, substituting your Github Personal Access Token for RepoToken below:
aws cloudformation deploy \
    --stack-name=ProductService-Pipeline \
    --template-file=pipeline.template.yml \
    --parameter-overrides \
        RepoToken='repo-token'
You'll then see output like this:
Waiting for changeset to be created..
Waiting for stack create/update to complete
Successfully created/updated stack - ProductService-Pipeline
Your first stack doesn't create much yet as you've only created an S3 bucket so far. We started with something small, because we like to deploy cloudformation templates with minimal changes between deploys so that a failed deploy will only rollback a small change and identifying the source of the failure is easier. The reason we started with the S3 bucket is that we need it to store "artifacts{:target="_blank"}", specifically our application source code and the outputs of the builds.
Next, we will add an IAM Role{:target="_blank"} to the template. We will configure CodePipeline, CodeBuild and CloudFormation to assume this role{:target="_blank"} when they execute. Because of this, we need to both ensure the role has the appropriate permissions to build and deploy our project as well as grant these AWS services the ability to assume the role.
Important Note For simplicity of this blog series, we are configuring multiple environments inside of a single AWS account. However, we very strongly recommend setting up an AWS account per environment{:target="_blank"} in practice. It's a seemingly counter-intuitive approach, but there are countless benefits to doing so that are beyond the scope of this series. When employing multiple accounts{:target="_blank"} you specify multiple roles or even specify role ARNs to assume inside of these different accounts, representing each deployment environment.
Add this under Resources in your pipeline.template.yml:
PipelineRole:
  Type: 'AWS::IAM::Role'
  Properties:
    AssumeRolePolicyDocument:
      Version: '2012-10-17'
      Statement:
        - Effect: 'Allow'
          Action: 'sts:AssumeRole'
          Principal:
            Service: 'codebuild.amazonaws.com'
        - Effect: 'Allow'
          Action: 'sts:AssumeRole'
          Principal:
            Service: 'codepipeline.amazonaws.com'
        - Effect: 'Allow'
          Action: 'sts:AssumeRole'
          Principal:
            Service: 'cloudformation.amazonaws.com'
    ManagedPolicyArns:
      - 'arn:aws:iam::aws:policy/AWSCodeBuildAdminAccess'
      - 'arn:aws:iam::aws:policy/AdministratorAccess'
Next we can update our stack by running our deploy command again. This time we won't specify the RepoToken parameter as CloudFormation will use the previously specified value. We also need to pass CAPABILITY_IAM{:target="_blank"} so we are allowed to create an IAM Role{:target="_blank"}:
aws cloudformation deploy \
    --stack-name=ProductService-Pipeline \
    --template-file=pipeline.template.yml \
    --capabilities CAPABILITY_IAM
From this point forward, we can use the above command to update our pipeline stack as needed.
We now need a place to store our Docker images. We probably don't want to push them to the public Docker Hub{:target="_blank"} and since we're trying to keep things simple, we can create an ECR{:target="_blank"} Repository{:target="_blank"} by adding the following snippet to our CloudFormation template and re-deploying:
DockerRepo:
  Type: 'AWS::ECR::Repository'
  Properties:
    RepositoryPolicyText:
      Version: '2012-10-17'
      Statement:
        - Sid: AllowPushPull
          Effect: Allow
          Action:
            - 'ecr:*'
          Principal:
            AWS:
              - !GetAtt PipelineRole.Arn
Now we can start working on the actual build and deploy process (a.k.a our "Pipeline"). Add the following resources to pipeline.template.yml. (Make sure to update the Repo and Branch variables below).
# This resource sets up the build. In general, all it does is run arbitrary shell commands inside of a docker
# container
BuildProject:
  Type: AWS::CodeBuild::Project
  Properties:
    #This is the role that the build will execute as. If your build needs to pull artifacts from S3 or reach out of its container for any reason make sure this role has the permissions to do so.
    ServiceRole: !GetAtt PipelineRole.Arn
    Source:
      #Where our sourcecode will come from (This special keyword says that CodePipeline will provide it)
      Type: CODEPIPELINE
    Environment:
      #This specifies what docker image and how much resources to give it to run the build.
      Type: LINUX_CONTAINER
      ComputeType: BUILD_GENERAL1_SMALL
      Image: aws/codebuild/docker:1.12.1
      EnvironmentVariables:
        #We can put anything we want here and these will be set as environment variables when the build runs.
        #We're leveraging this to point to the Docker image repository we created earlier.
        - Name: DOCKER_IMAGE_URL
          Value: !Sub '${AWS::AccountId}.dkr.ecr.${AWS::Region}.amazonaws.com/${DockerRepo}'
    Artifacts:
      #Send any output back to code pipeline
      Type: CODEPIPELINE
Pipeline:
  #This is the "Pipeline" or order flow of execution.
  Type: AWS::CodePipeline::Pipeline
  DependsOn:
    - BuildProject
  Properties:
    ArtifactStore:
      Type: 'S3'
      Location: !Ref ArtifactStorage
    RoleArn: !GetAtt PipelineRole.Arn
    RestartExecutionOnUpdate: true
    Stages:
      #The first step triggers with changes in Github
      - Name: Source
        Actions:
          - Name: Source
            ActionTypeId:
              Category: Source
              Provider: GitHub
              Owner: ThirdParty
              Version: 1
            OutputArtifacts:
              - Name: sourceCode
            Configuration:
              Owner: 'sourceallies' #Update this with your github username
              Repo: 'node-reference' #The repository to checkout
              Branch: master
              OAuthToken: !Ref RepoToken
        #Step two is to build the project using our configured CodeBuild project above.
      - Name: Build
        Actions:
          - Name: Build
            ActionTypeId:
              Category: Build
              Owner: AWS
              Provider: CodeBuild
              Version: 1
            InputArtifacts:
              - Name: sourceCode
            Configuration:
              ProjectName: !Ref BuildProject
            OutputArtifacts:
              - Name: buildResults
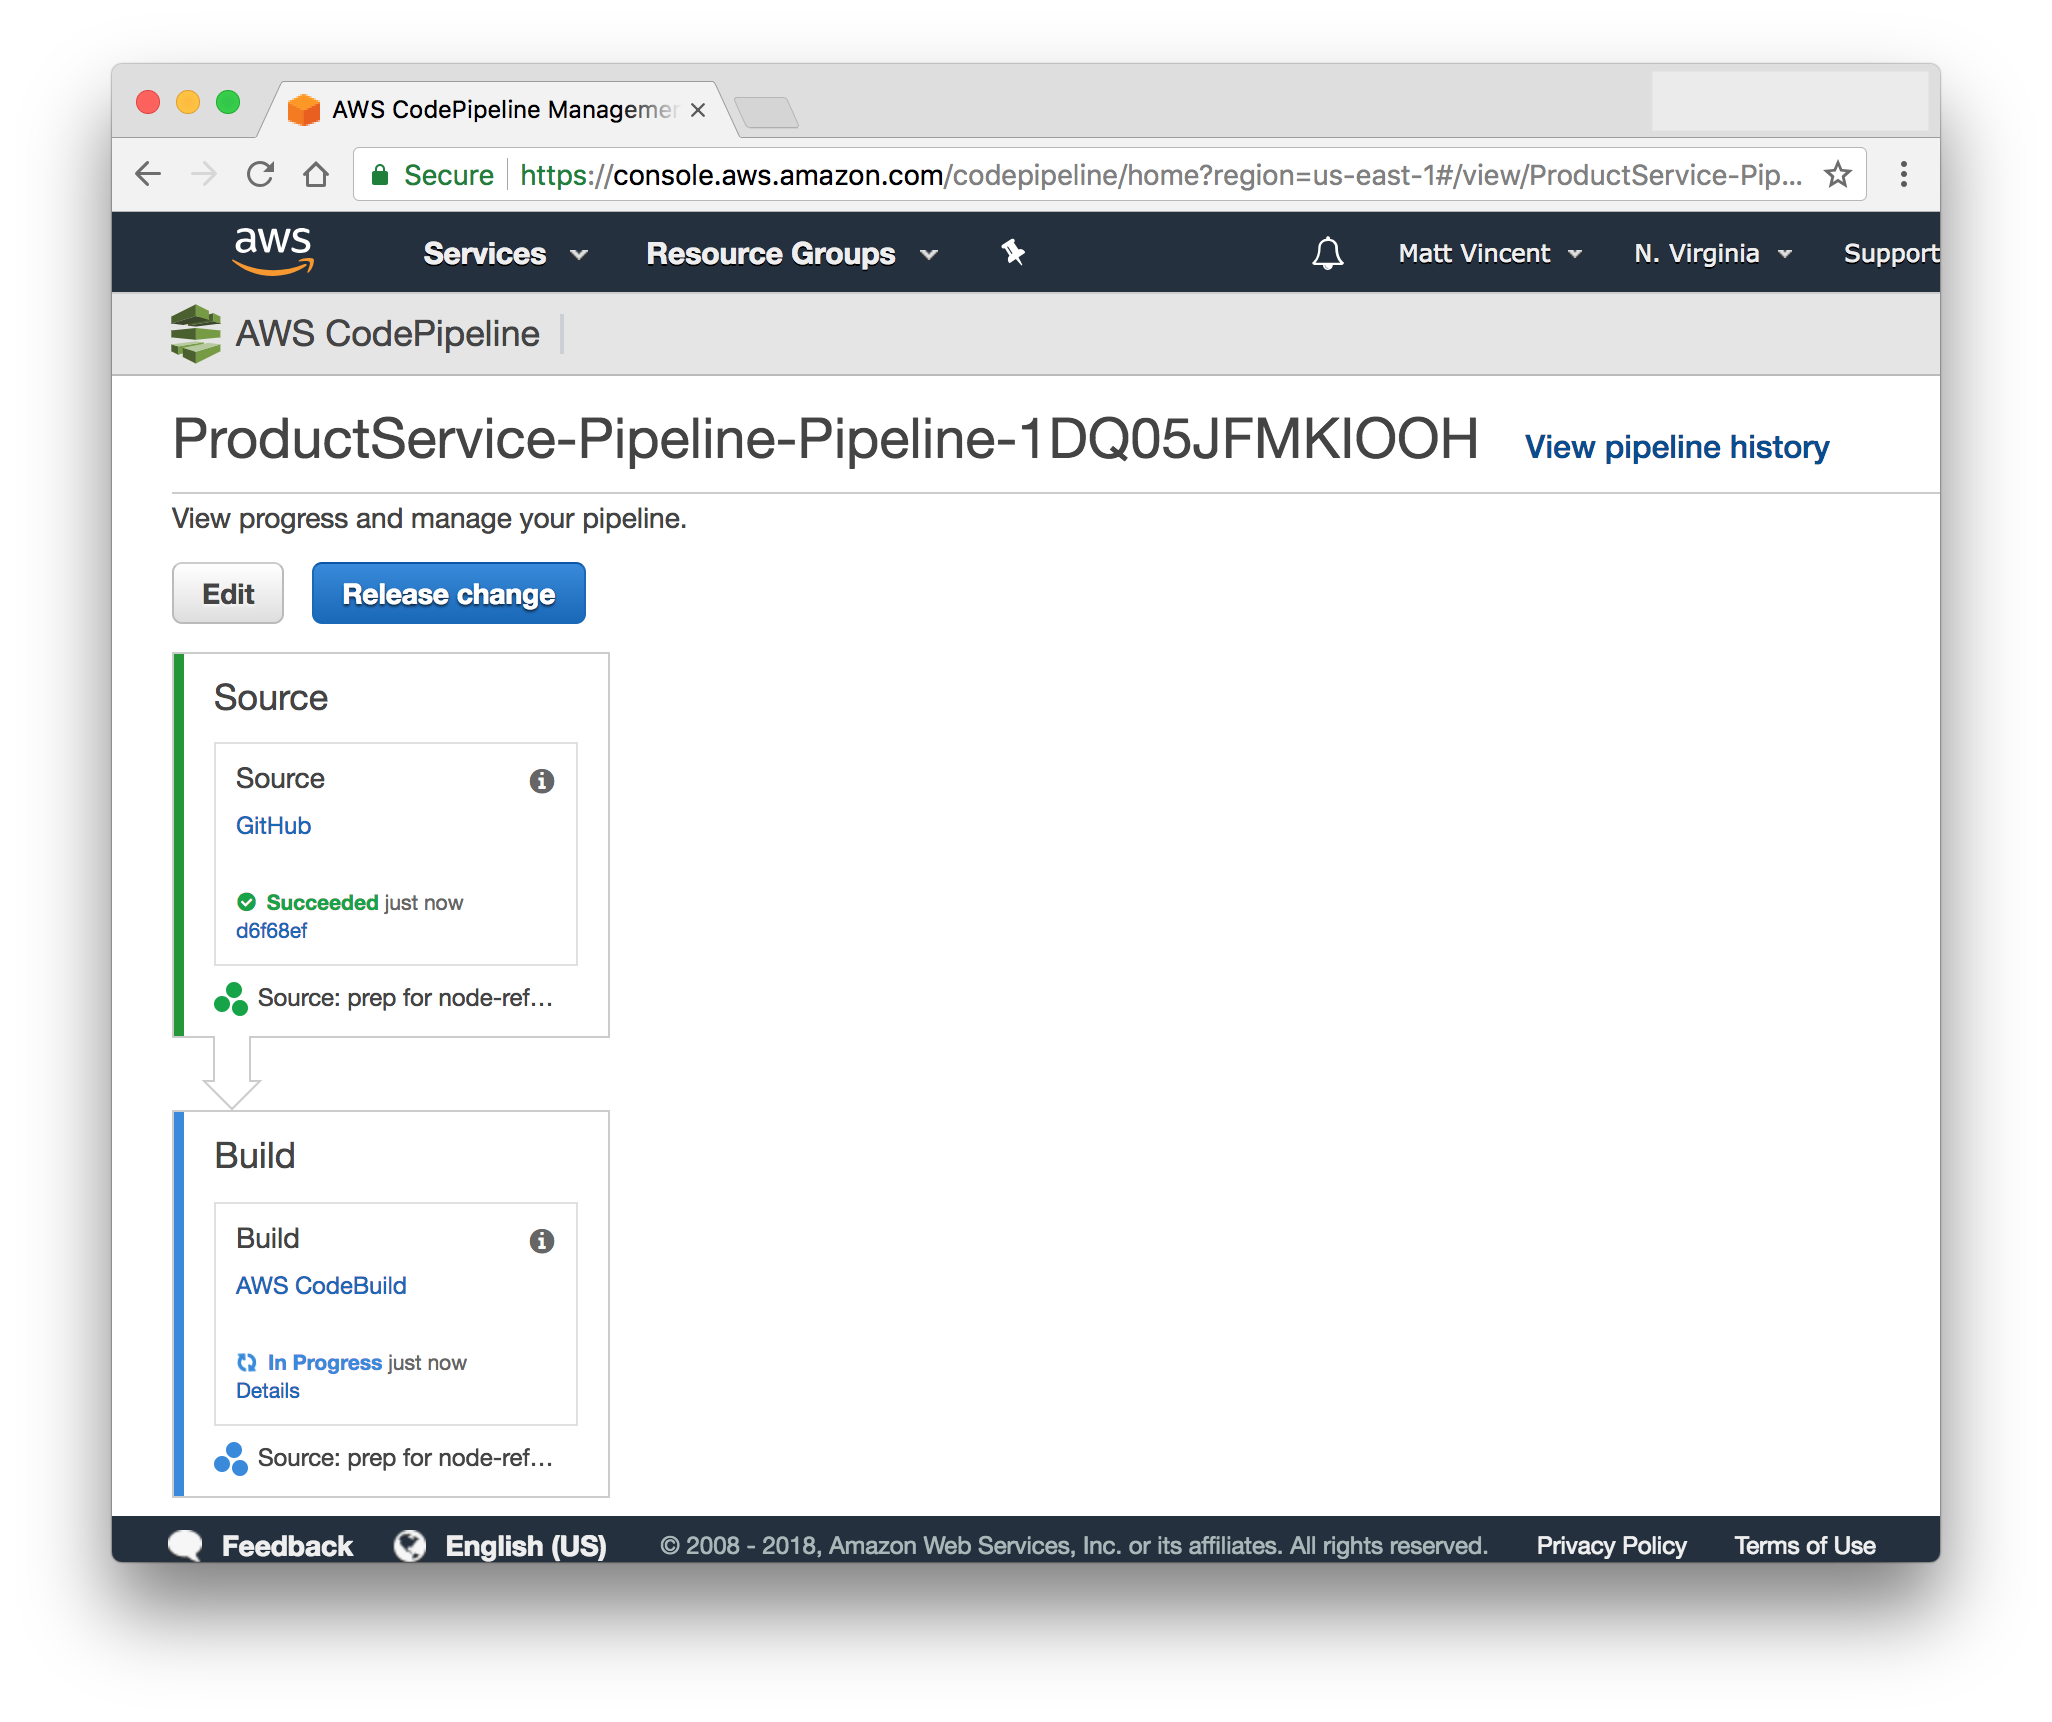
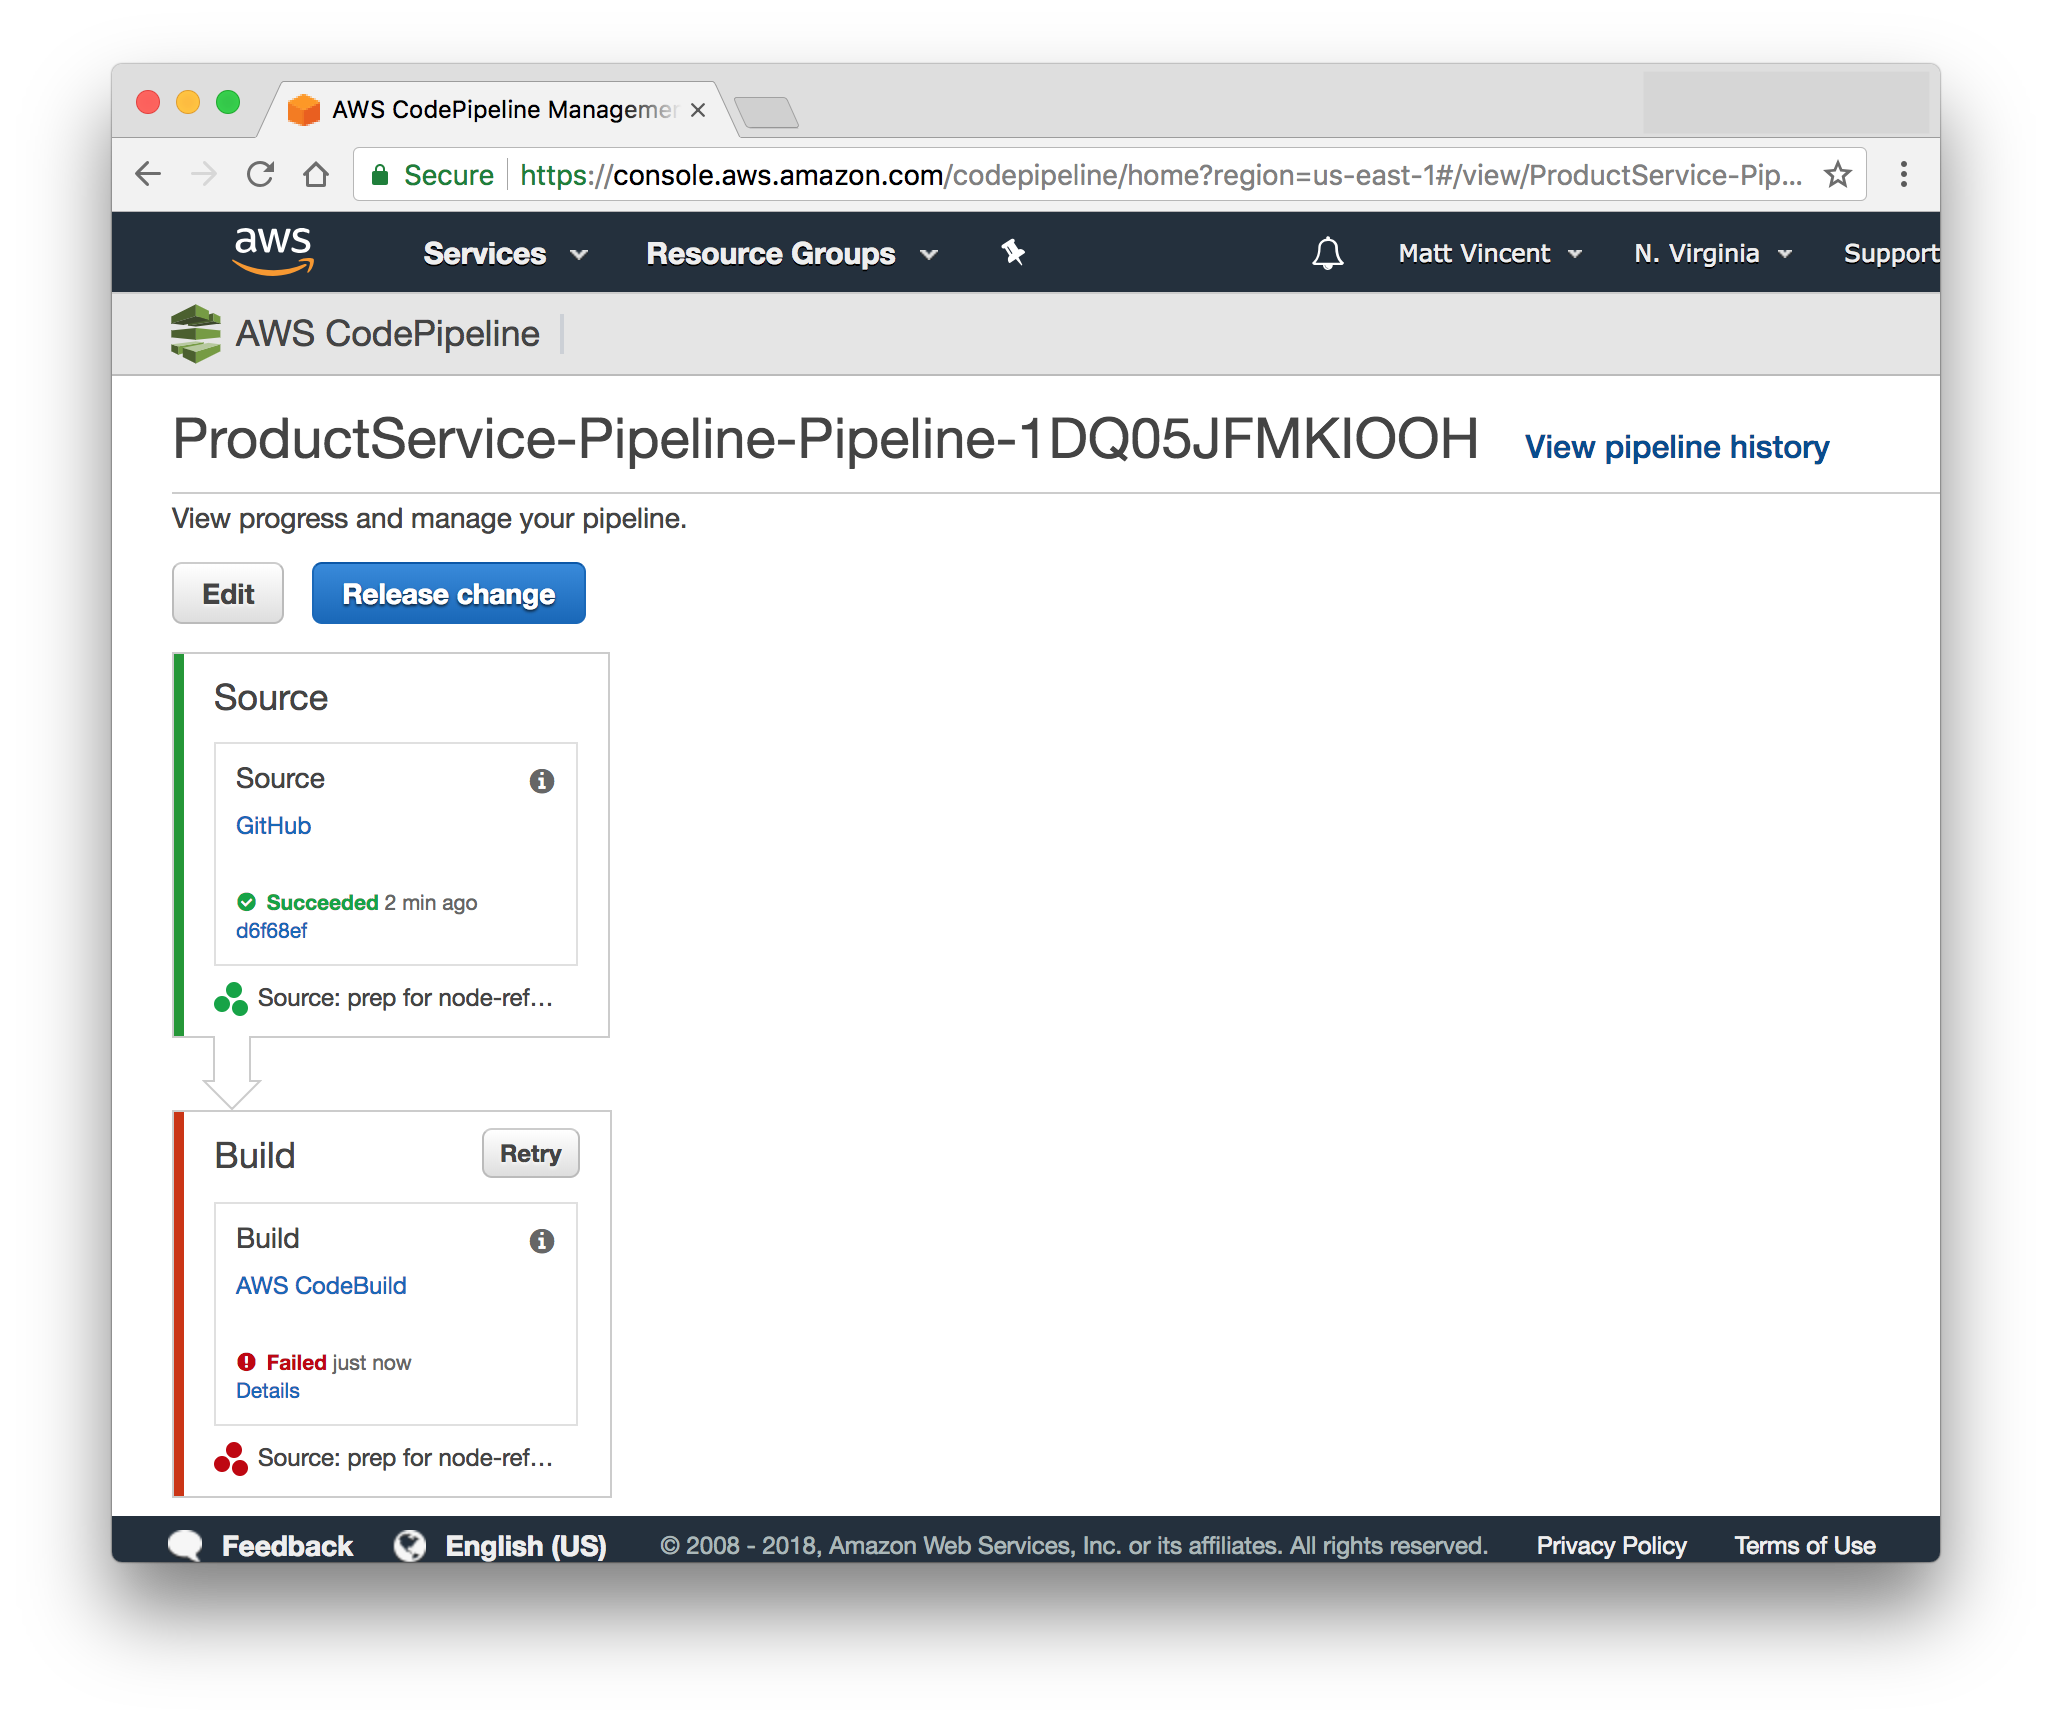
Execute another stack update and you should see a build kick off in the CodePipeline console and fail at the build stage because it can't find a buildspec.yml file.

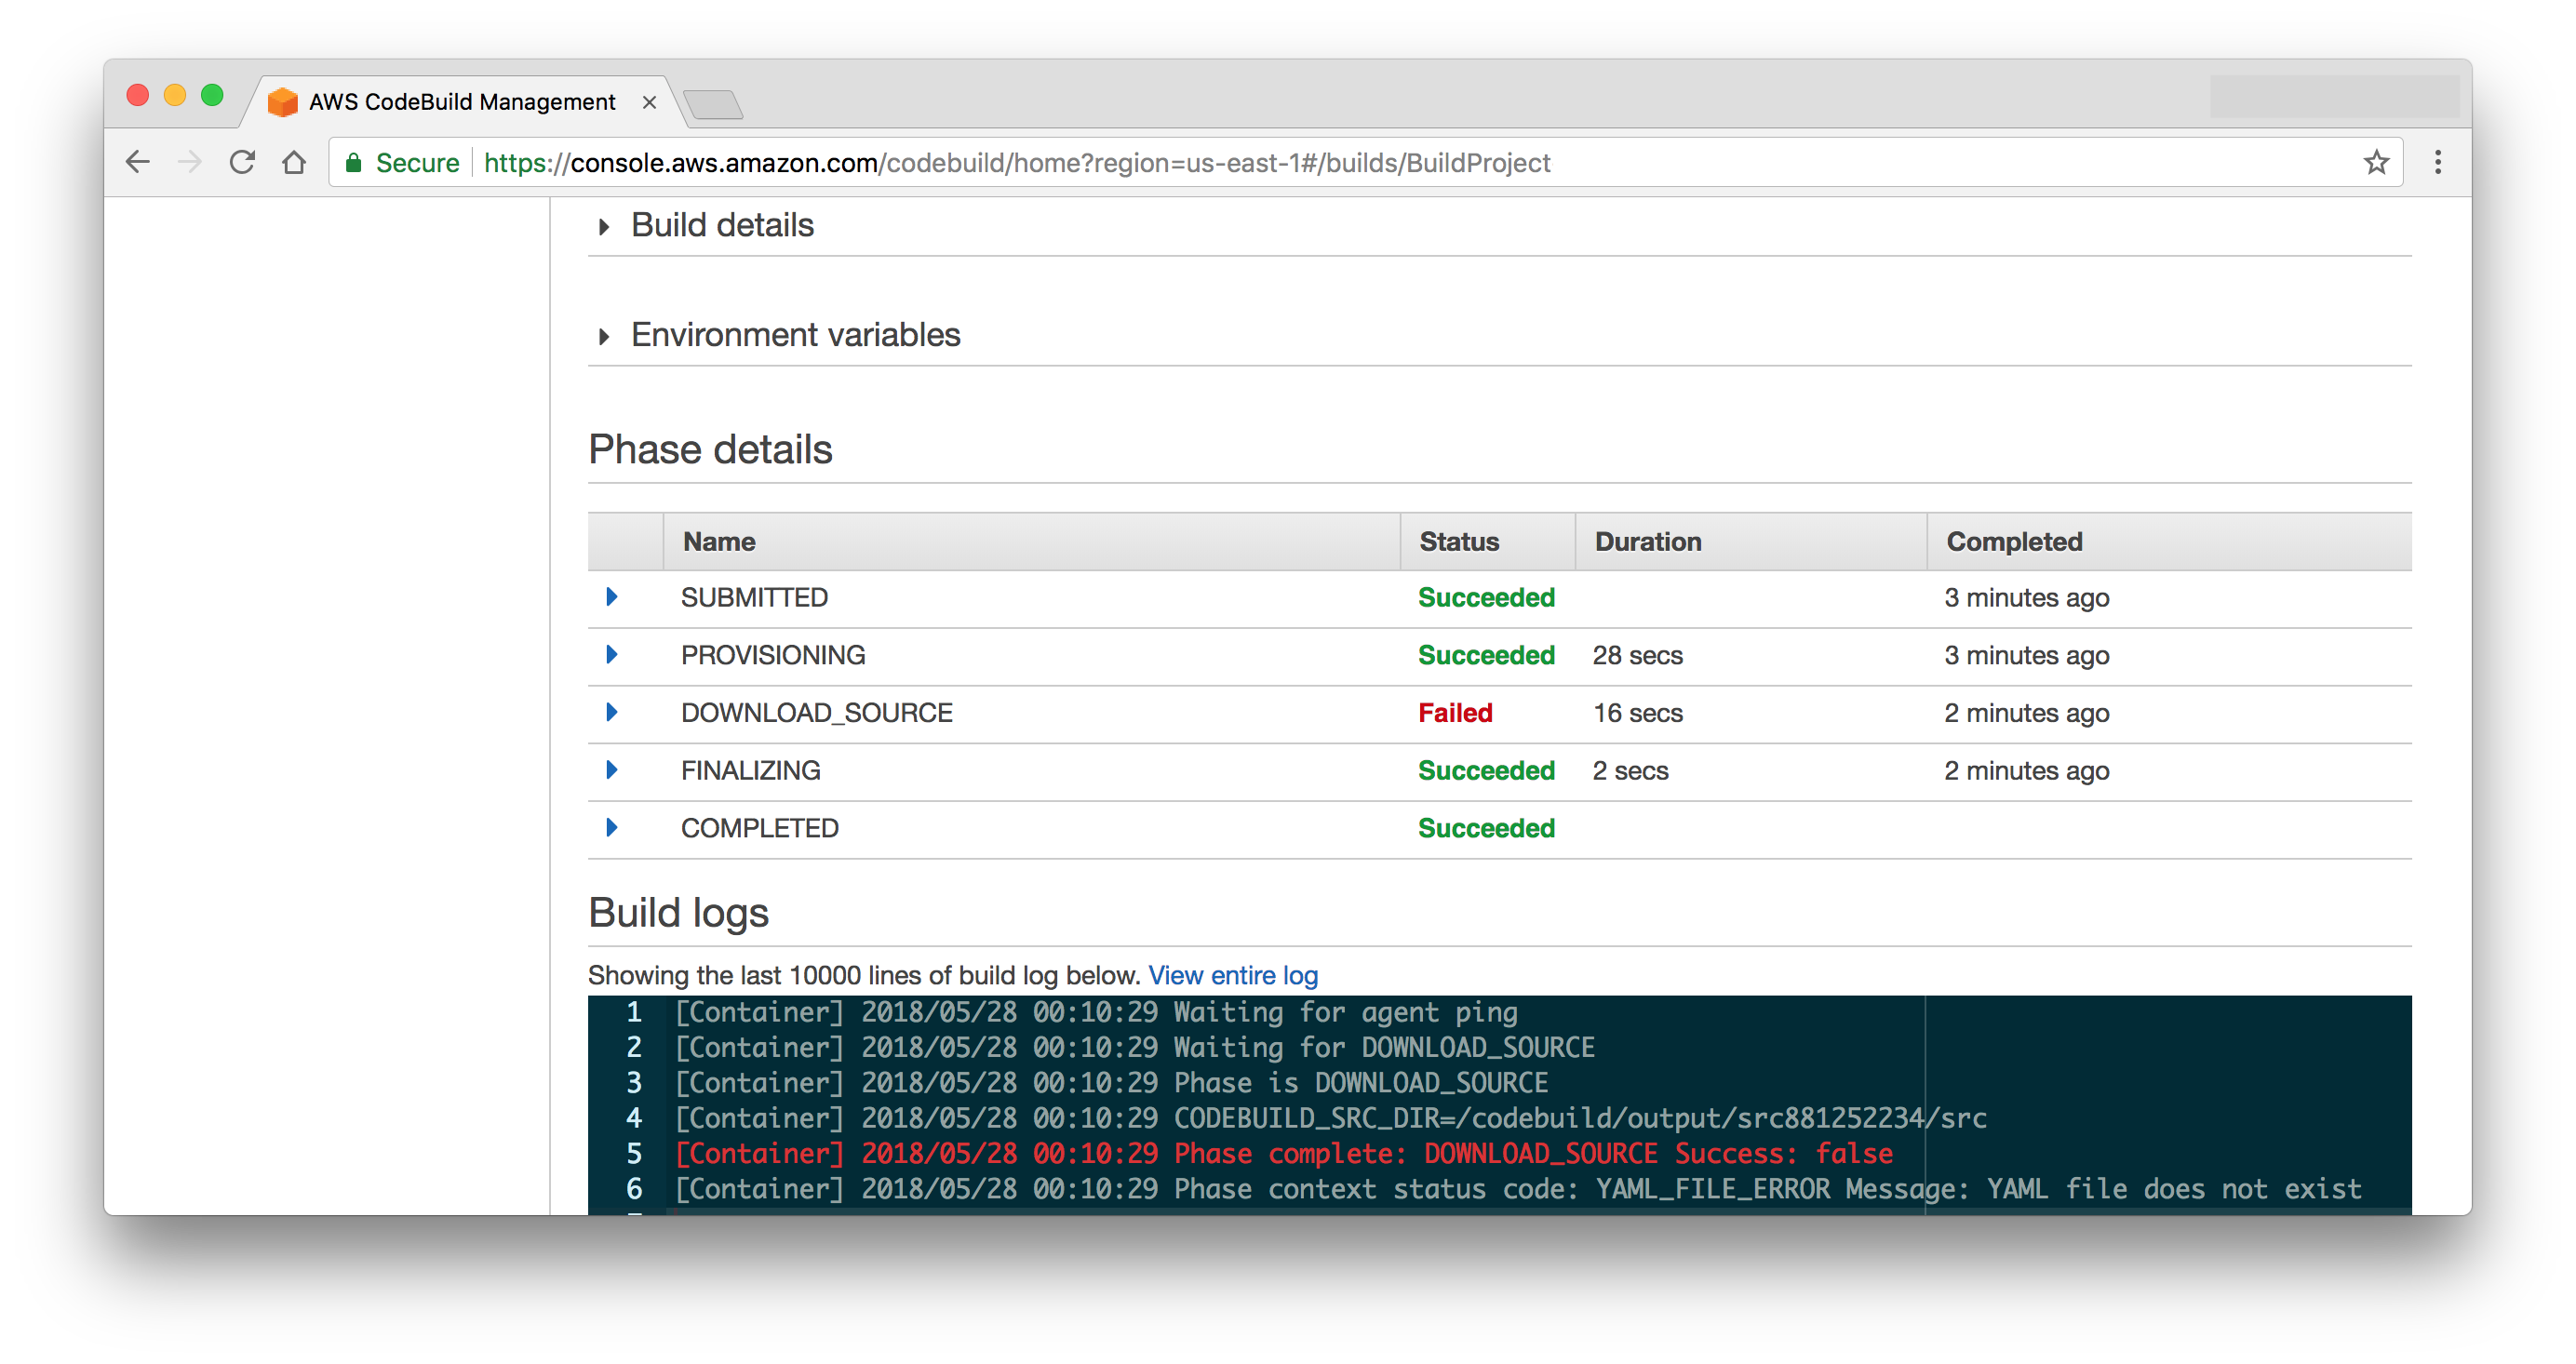
By default AWS CodeBuild{:target="_blank"} looks in the root of the source code repository for this file. Our version of this file is pretty simple since most of the heavy lifting will be done by Docker. Create a buildspec.yml file with these contents:
version: 0.2
env:
  variables: {}
phases:
  pre_build:
    commands:
      - export RELEASE_IMAGE_URL="$DOCKER_IMAGE_URL:$CODEBUILD_RESOLVED_SOURCE_VERSION"
  build:
    commands:
      - docker build --tag "$RELEASE_IMAGE_URL" .
      - sed --in-place='bak' --expression="s|RELEASE_IMAGE_URL|${RELEASE_IMAGE_URL}|" parameters/*.params.json
      - $(aws ecr get-login)
      - docker push "$RELEASE_IMAGE_URL"
artifacts:
  discard-paths: yes
  files:
    - "cloudformation.template.yml"
    - "parameters/*"
These are simply shell scripts that are executed in order. The first step (in pre_build{:target="_blank"}) is to calculate a Docker image tag that we will push to specify this build. It is important that we create a unique image for each build so that the deployment of a version will deploy the code built for that version and not simply the last build to execute. the DOCKER_IMAGE_URL variable was configured by our CloudFormation template and the CODEBUILD_RESOLVED_SOURCE_VERSION is a built in variable populated by CodeBuild{:target="_blank"}.
Next, we use Docker to build our image. We then replace the "RELEASE_IMAGE_URL" placeholder with the full id of the image in each parameter file located in the parameters directory. We need some way to pass the Docker image URL into the CloudFormation template that executes the deployment without the template knowing the version ahead of time. To do this, we create a properties file and publish it as a build artifact. The artifacts section is a list of files that get copied forward and can be referenced by later stages in our pipeline (i.e. the deployments to Dev, Qual and Prod).
Create a json files to hold the parameters at parameters/dev.params.json and parameters/prod.params.json with this content:
{
    "Parameters": {
        "Image": "RELEASE_IMAGE_URL"
    }
}
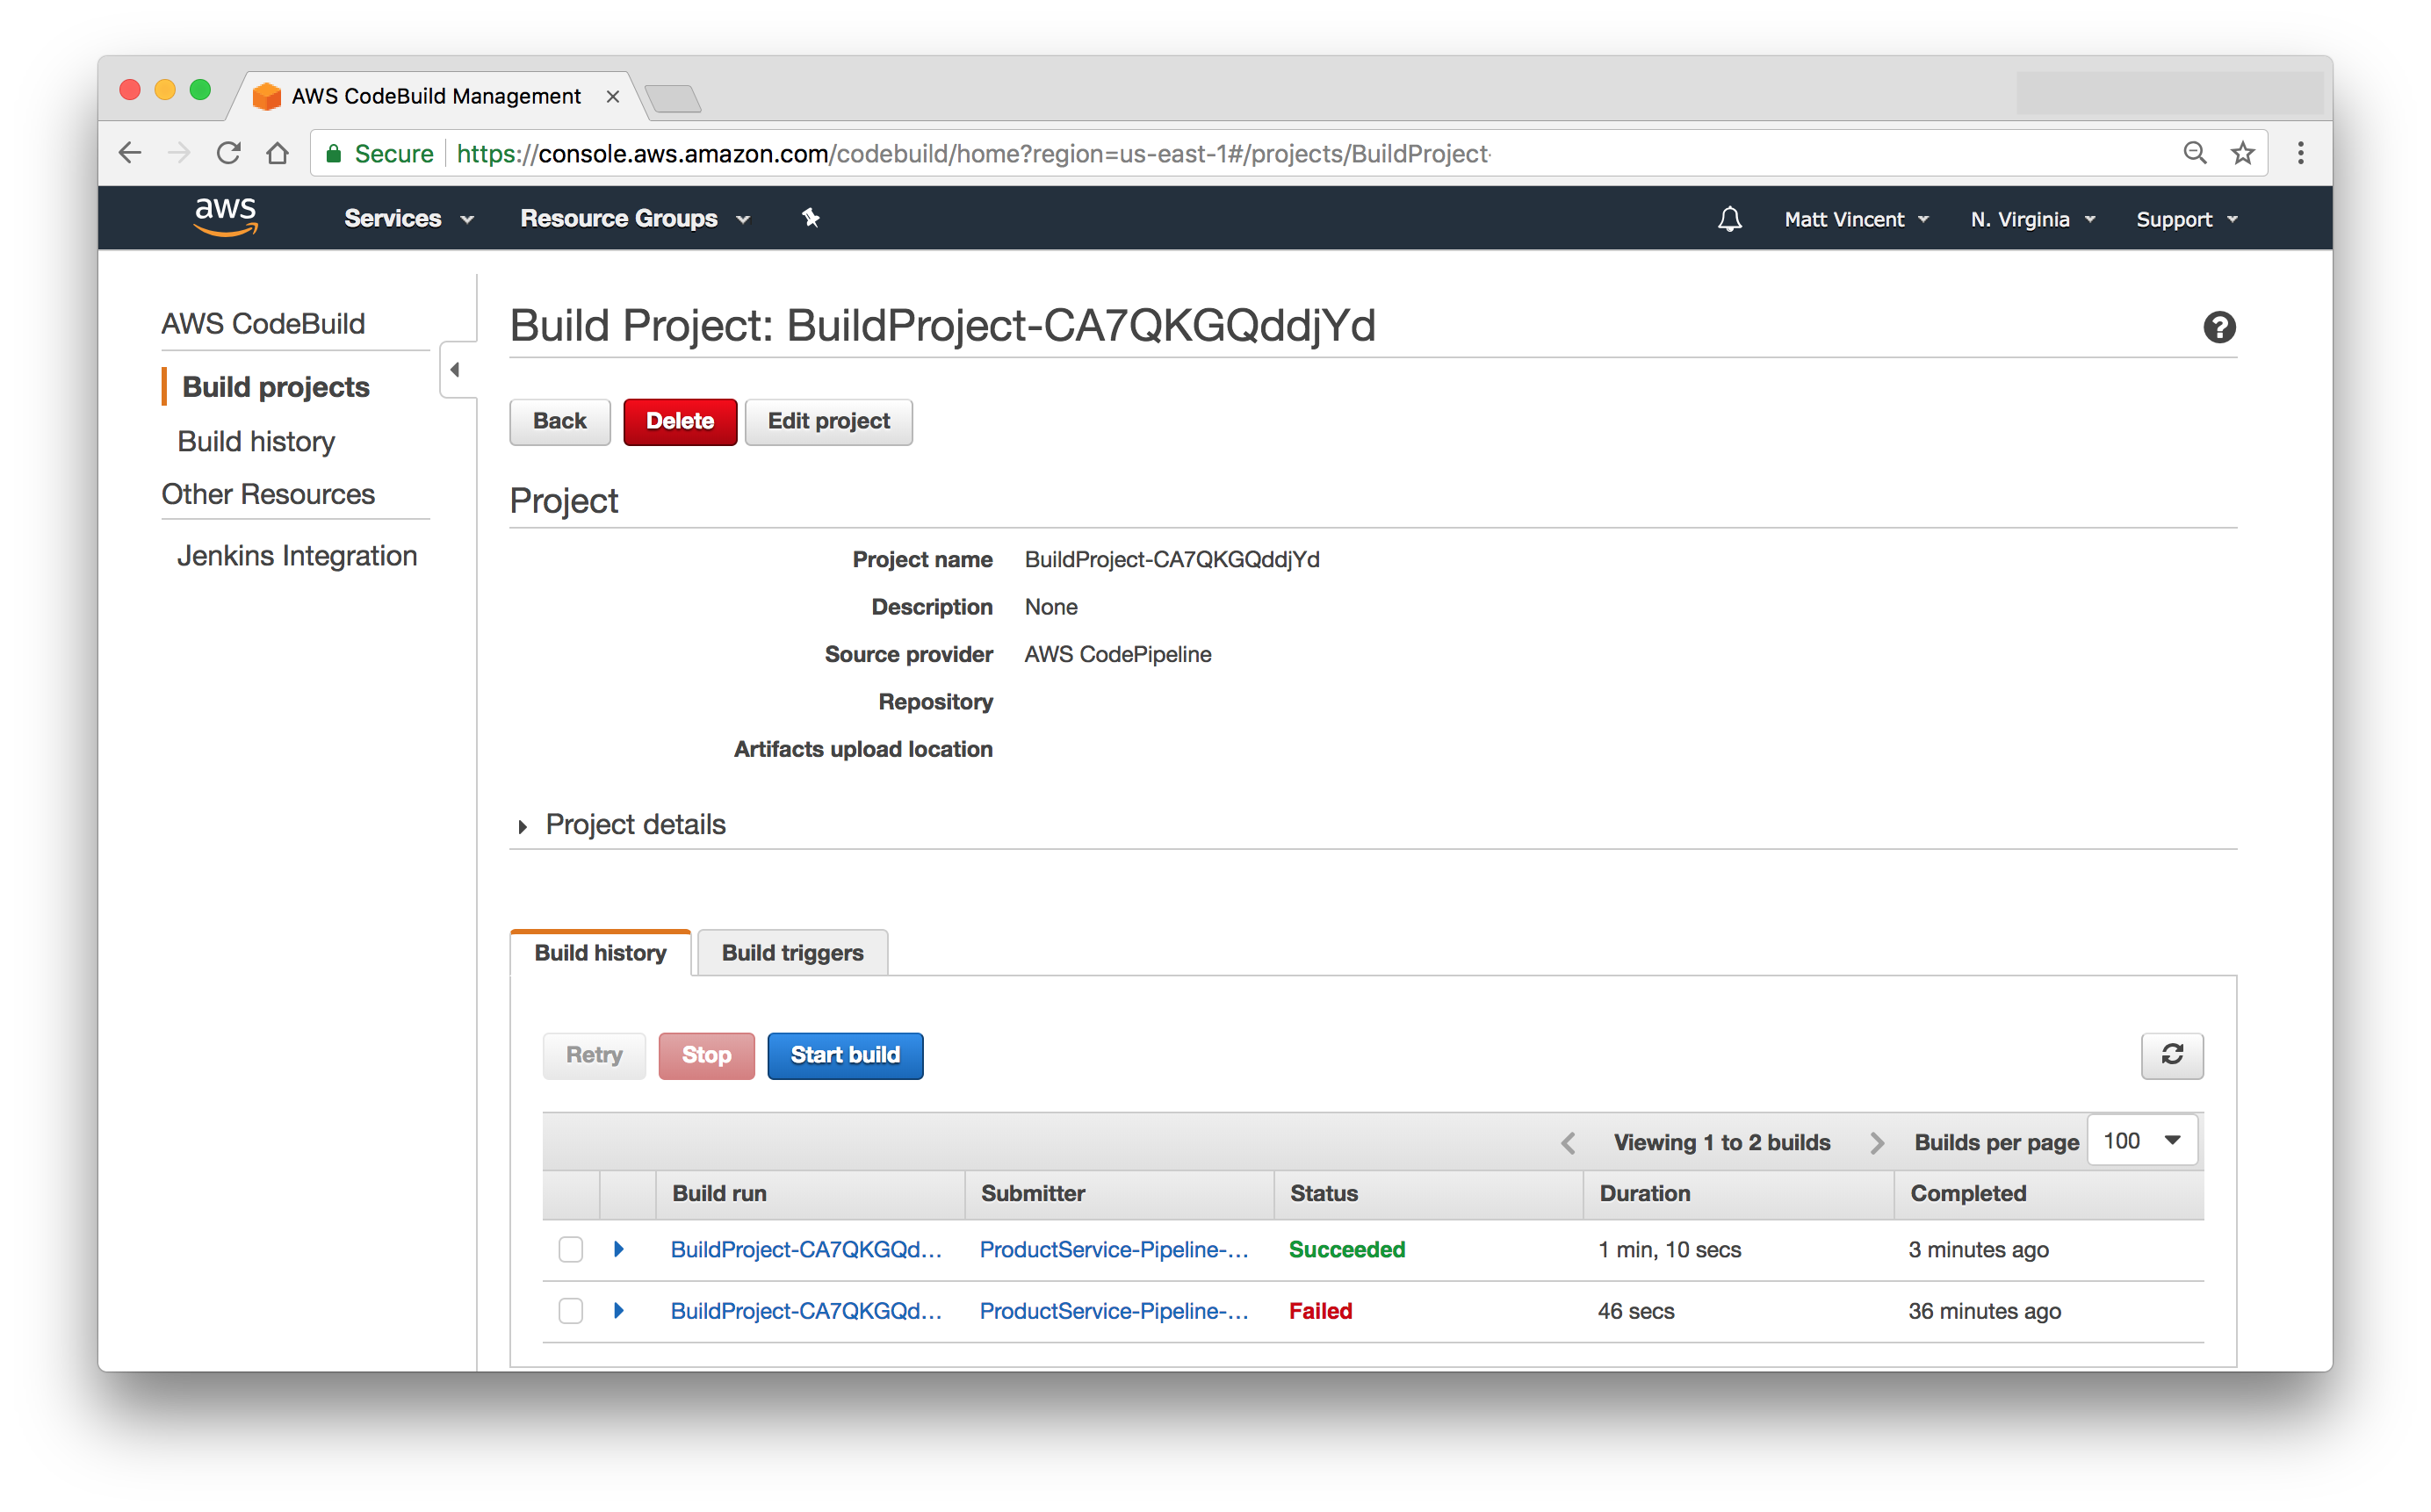
Check in the buildspec.yml, parameters/dev.params.json and parameters/prod.params.json files and wait for a build to kick off.
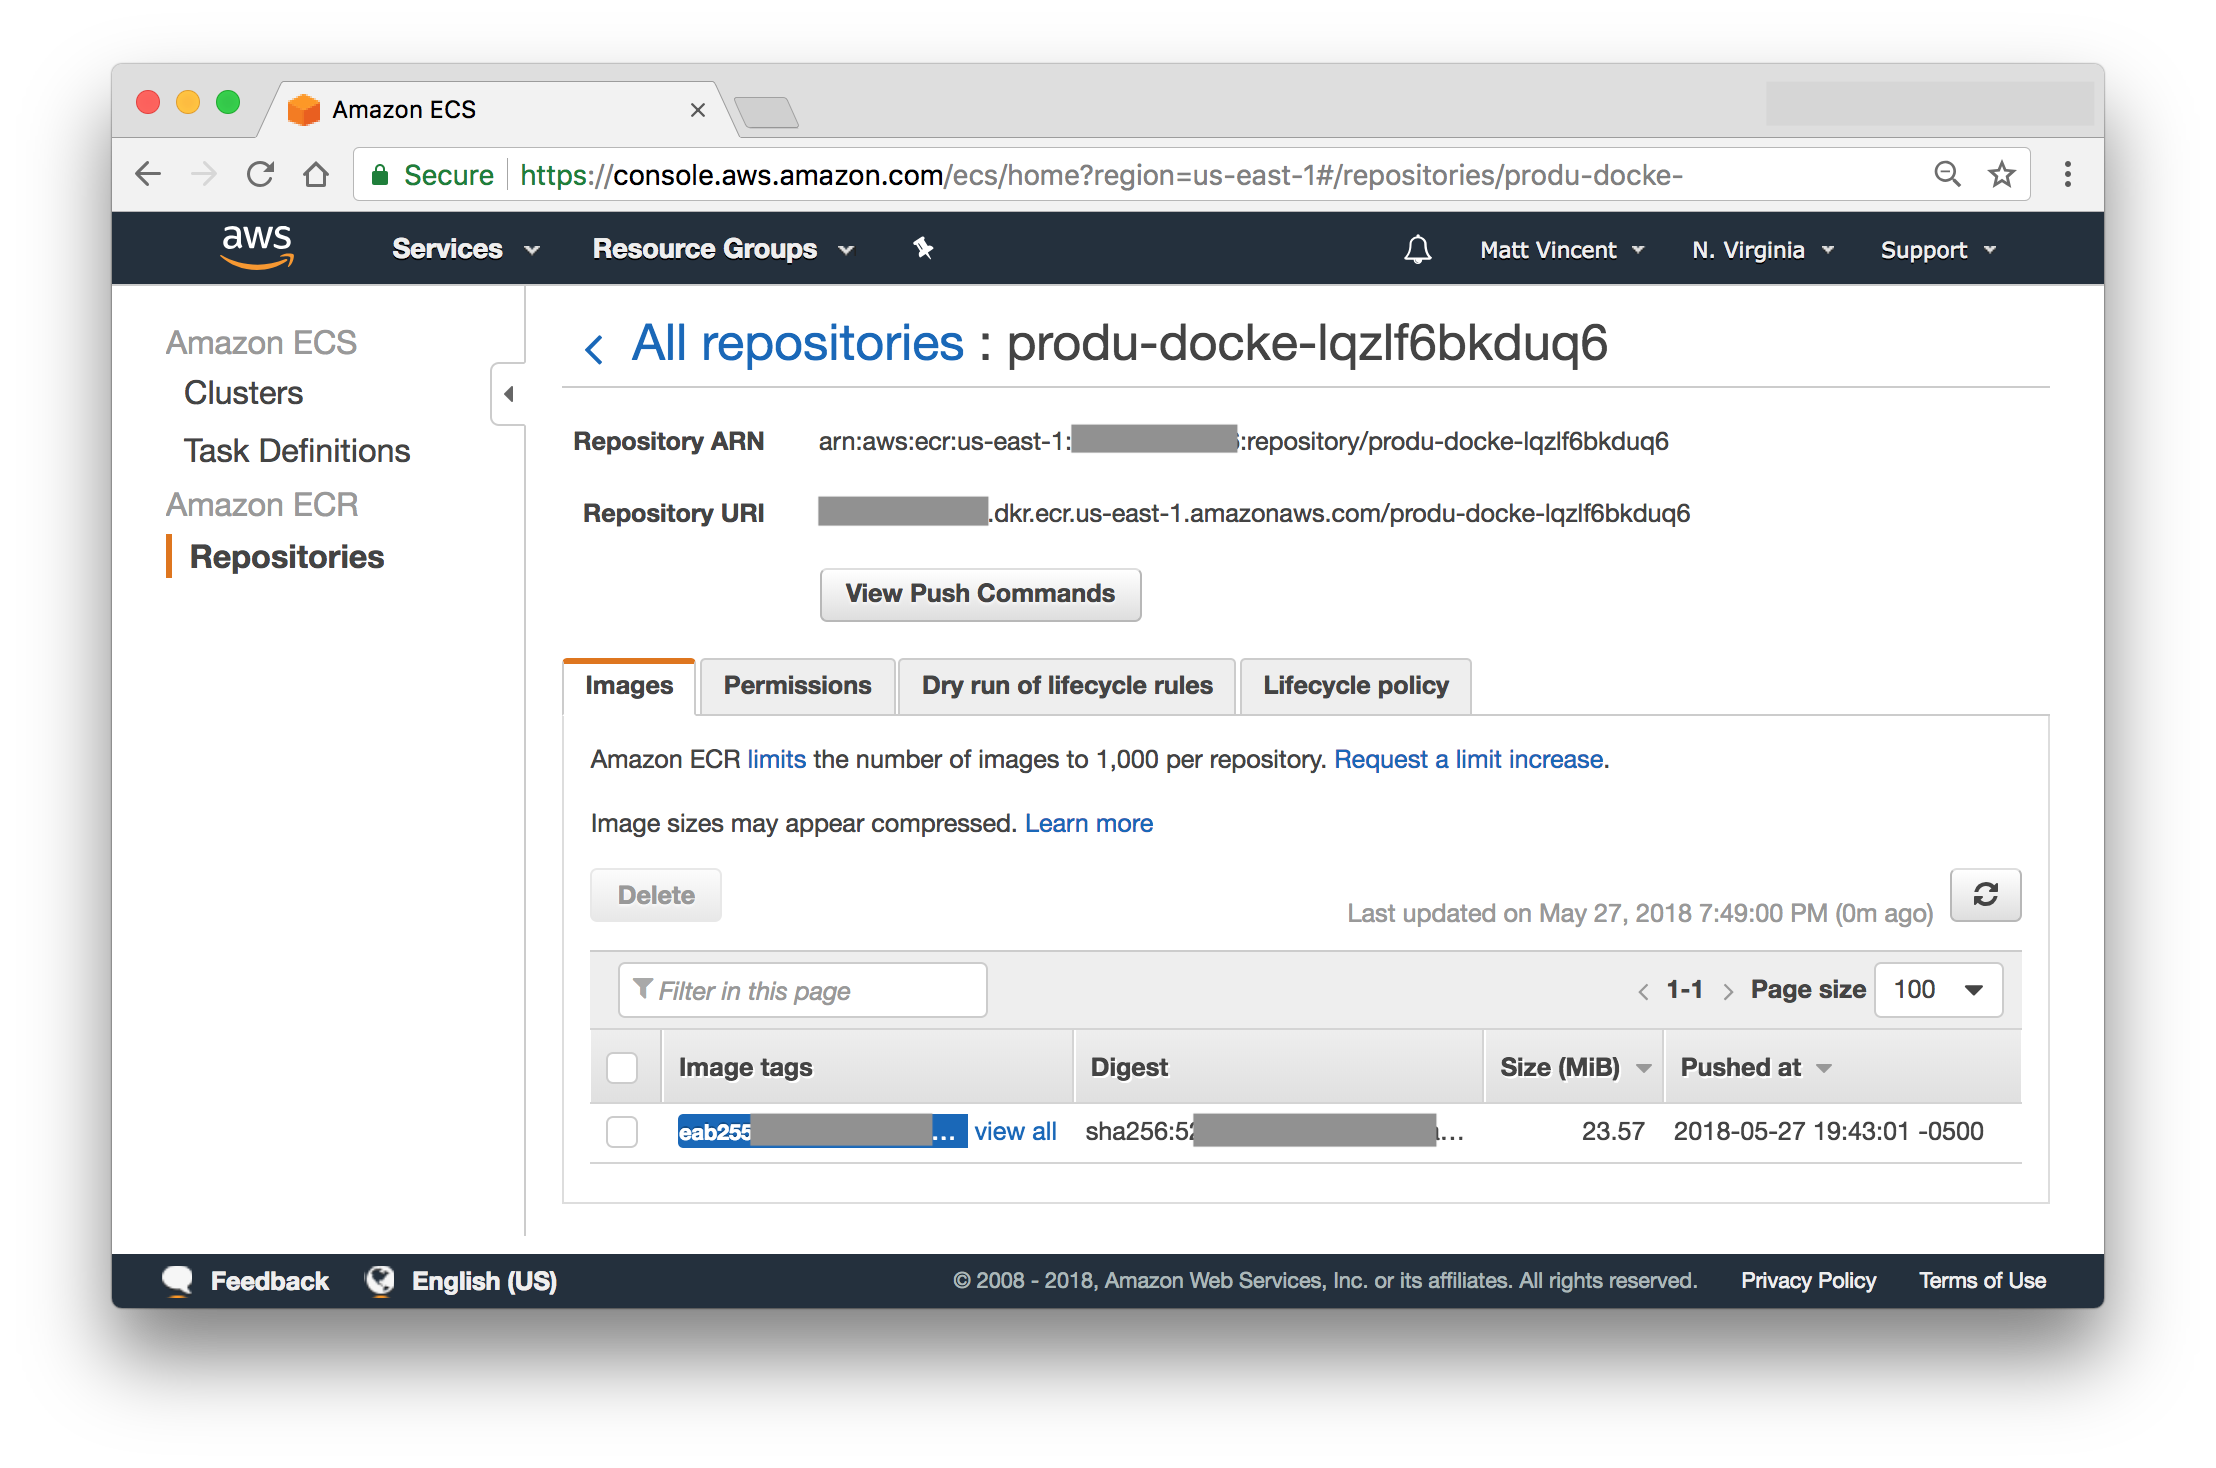
If all works well you should have a new docker image in your docker repo and a successful build.
Wrap-up
In this article, we setup a build pipeline using AWS CodePipeline. You can see the full CloudFormation pipeline template and buildspec.yml for our microservice here:
- pipeline.template.yml{:target="_blank"}
- buildspec.yml{:target="_blank"}
You can also see all changes as a result of this post.
Table of Contents
- Introduction
- Unit Testing
- Koa
- Docker
- Cloudformation
- Code Pipeline (this post)
- Fargate
- Application Load Balancer
- HTTPS/DNS
- Cognito
- Authentication
- DynamoDB
- Put Product
- Validation
- Smoke Testing
- Monitoring
- List Products
- Get Product
- Patch Product
- History Tracking
- Delete
- Change Events
- Conclusion
If you have questions or feedback on this series, contact the authors at nodereference@sourceallies.com.