Sharing Our Passion for Technology
& Continuous Learning

Prerequisites
This article builds on the prior article about AWS CodePipeline.
Fargate History
With an automated build process underway, it is now time to switch focus to the application's runtime environments. We will be creating two environments: Development (aka. Dev) and Production (aka. Prod).
Consider wether your project needs more than two environments. Talk with your team about what the definition and use-cases of the various environments are. Are you going to do all end-user demos in a specific environment? Do you have business users that want the ability to "play around" in an environment that is not production but also not under active development? New environments can always be added later. Extra environments carry additional cost but we can leverage the same code to maintain them.
The runtime environment for our Docker image is going to be the Elastic Container Service{:target="_blank"}. More specifically, we will utilize the Fargate{:target="_blank"} configuration. While marketed as a separate product, Fargate is really just a couple of extra configuration values given to an ECS Service{:target="_blank"} and TaskDefinition{:target="_blank"}.
Before the introduction of Fargate there were three main options to run a serverless system on AWS. The first was Elastic Beanstalk{:target="_blank"}. This was a fairly heavyweight service that creates virtual machines for each application (although MultiContainer Docker Environments{:target="_blank"} were later supported) under the covers and provides an abstraction layer for managing these virtual machines. It reduced the burden of maintaining servers, but only partially and it did not address the cost associated with a virtual machine per service approach.
The second serverless{:target="_blank"} option, AWS Elastic Container Service{:target="_blank"}, is a managed Docker cluster that allows the deploying of custom Docker images to a pool of virtual machines. This brings with it the advantages of extremely consistent deployments (due to Docker's design), as well as reduced cost (because multiple applications can share the same virtual machine). We still have to manage a pool of virtual machines that host these Docker containers.
The third serverless{:target="_blank"} option, AWS Lambda{:target="_blank"}, is a mechanism that allows for a fully "serverless" deployment.
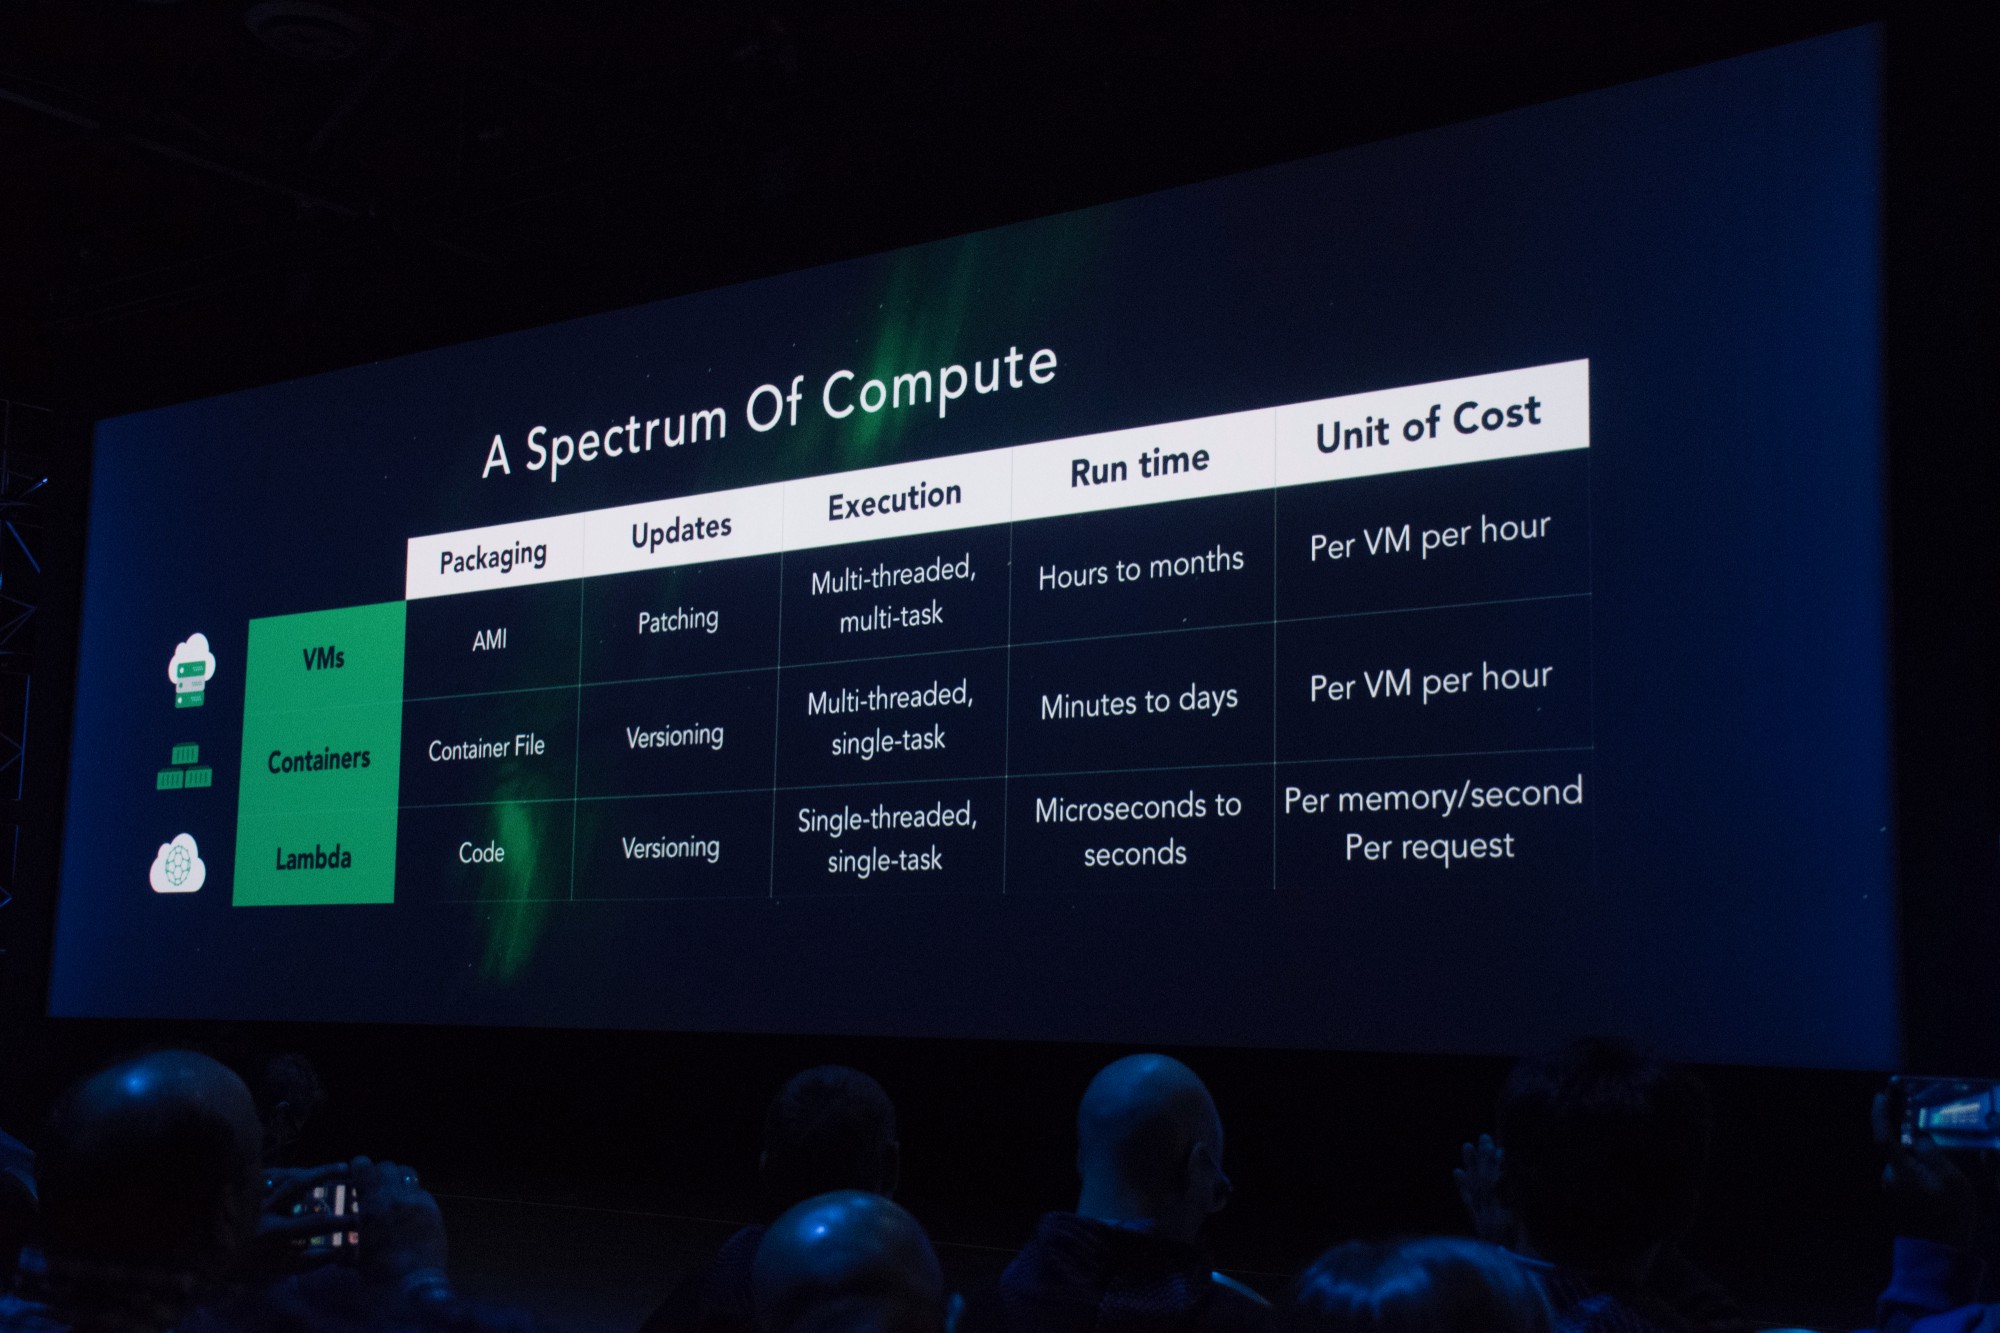
This slide from the 2016 AWS re:Invent keynote shows the vision at that time on how Lambdas fit into the compute spectrum:
To create a Lambda{:target="_blank"}, a snippet of code (generally doing one small task) is uploaded to AWS and hooked into an event. When the event occurs (a message on a queue or a HTTP request is received), AWS provisions capacity on a pool of VMs managed by AWS and executes the provided code. This is an extremely attractive option because there are no servers to manage and we are only charged when our service is actually executing (by the memory and time consumed).
This model works really well in response to asynchronous events like messaging or a schedule but has some serious downsides when reacting to latency sensitive HTTP events along with several other drawbacks:
- The languages and versions of those languages supported{:target="_blank"} is limited and made available by AWS and on AWS's schedule. Want to use the newest version of Node.js? Too bad, you'll have to wait until Lambda supports it. Want to deploy a Rust application? Too bad, Lambda doesn't support it (yet). This may be fine for small, one-off events (Like a nightly job that just needs to hit an API) but for a larger and more complicated code base (like a non-trivial production service) these restrictions may not be acceptable.
- Your code is not always running (this is what makes it so cheap). Because of this, the first request to hit it will cause the Lambda to be "cold-started". This involves the Lambda subsystems downloading, provisioning and starting your code. Once done, the Lambda will stay "hot" for as long as it is continuously receiving requests, but as soon as those requests die off for a few minutes, AWS will evict the code to make room for other peoples' applications on its servers. This "cold-start" time is anywhere from 3-10 seconds and because of this, an SLA{:target="_blank"} requirement of having subsecond API calls is simply impossible to ensure.
- Configuration sprawl is also a concern. A simple hello-world app may only have one or two Lambda events and therefore only require a couple dozen lines of CloudFormation configuration to hook them together. However, as the application grows, the amount of CloudFormation configuration that needs to be managed grows in lockstep with it. Every HTTP route, and every HTTP method for each of those HTTP routes is a separate Lambda declaration as well as a separate API Gateway resource/method configuration to hook up that Lambda. All of this adds up to a lot of configuration that needs to be exactly correct in order for the application to deploy and this is almost impossible to validate locally.
- There is no exposed lifecycle for a Lambda. There is no good way to do something "on-start" and to keep state between requests. Generally, microservices are stateless, however, mature applications still often have the need to maintain a cache of data or to download or compile data on startup (For example, spinning up Spring in the Java world or Entity Framework using reflection to pre-compute SQL statements in the .NET world).
- Lambdas do not have access to the raw HTTP request. They are receiving "Events" from API Gateway. These events are not a pipe back into the TCP connection with the client but rather an encapsulated request. This is fine for small JSON payloads both ways but often there is a need (even if rarely) to either stream data back to the client (scanning a DB table and converting to CSV for an "Export" functionality) or for the ability to accept multi-part binary content in an upload from the client.
All of the above limitations are navigable but require a lot of extra complexity and workarounds that add to the risk of the application and make it harder to maintain and evolve.
Fargate{:target="blank"} solves these problems for us. It allows us to deploy a Docker container of our choosing (which means we can run any version of anything that runs on Linux; Fargate does not _yet support Windows{:target="_blank"}) on a pool of virtual machines that are managed by AWS (so we don't have to worry about capacity planning and OS patching). The containers are run on our schedule (ie. scheduled or around the clock) so there is no cold-start time. They also just run a normal Linux process so we can do work "on-start" or store files locally on disk. We can run the application locally exactly how it runs in AWS. And, because a Fargate service can receive HTTP traffic (or raw TCP if you prefer), we can leverage the entire HTTP feature set (streams, websockets, HTTP/2 etc). We can keep routing configuration encapsulated in, and closer to, the code that is actually handling that route.
The main downside to all of this is simply cost. Outside of batch jobs or single run tasks, we have to pay to run the container all the time. While this may be significant if there are many environments that need multi gigabyte containers, our Node.js app can happily run on the minimum specs{:target="_blank"} at a cost of about $12 per month per environment.
Fargate Deployment
The first step in this process is to create a cloudformation template with an ECS cluster in it. This cluster will not contain any dedicated VMs but we still need it as a container to reference. Create a cloudformation.template.yml file in the root of the repository with the following content:
AWSTemplateFormatVersion: "2010-09-09"
Description: Product Service
Parameters:
  Image:
    Type: String
    Description: Docker image to run
Resources:
  ECSCluster:
    Type: "AWS::ECS::Cluster"
    Properties: {}
Now add the following CodePipeline Stages{:target="_blank"} to your pipeline.template.yml file within the pipeline at the end. These will deploy our environments in quick succession:
- Name: Deploy_DEV
  Actions:
  - Name: Deploy
    RoleArn: !GetAtt PipelineRole.Arn
    ActionTypeId:
      Category: Deploy
      Owner: AWS
      Provider: CloudFormation
      Version: '1'
    InputArtifacts:
      - Name: buildResults
    Configuration:
      #this is the name of the stack
      StackName: ProductService-DEV
      #becuase this is dev, if the deploy fails on the first create, just destroy it rather than getting stuck in CREATE_FAILED state
      ActionMode: REPLACE_ON_FAILURE
      #this special syntax represents the file we put in our "artifacts" section of the buildspec.yml
      TemplatePath: buildResults::cloudformation.template.yml
      TemplateConfiguration: buildResults::dev.params.json
      RoleArn: !GetAtt PipelineRole.Arn
      Capabilities: CAPABILITY_IAM
  #This is the same as the stage above except the StackName, ActionMode and TemplateConfiguration are different
- Name: Deploy_PROD
  Actions:
  - Name: Deploy
    RoleArn: !GetAtt PipelineRole.Arn
    ActionTypeId:
      Category: Deploy
      Owner: AWS
      Provider: CloudFormation
      Version: '1'
    InputArtifacts:
      - Name: buildResults
    Configuration:
      StackName: ProductService-PROD
      #Create or update the stack, but don't delete it if it fails
      ActionMode: CREATE_UPDATE
      TemplatePath: buildResults::cloudformation.template.yml
      TemplateConfiguration: buildResults::prod.params.json
      RoleArn: !GetAtt PipelineRole.Arn
      Capabilities: CAPABILITY_IAM
Check in{:target="_blank"} your cloudformation.template.yml file and then update the pipeline stack via the AWS CLI{:target="_blank"} as shown below:
aws cloudformation deploy   \
--stack-name=ProductService-Pipeline  \
--template-file=pipeline.template.yml  \
--capabilities CAPABILITY_IAM
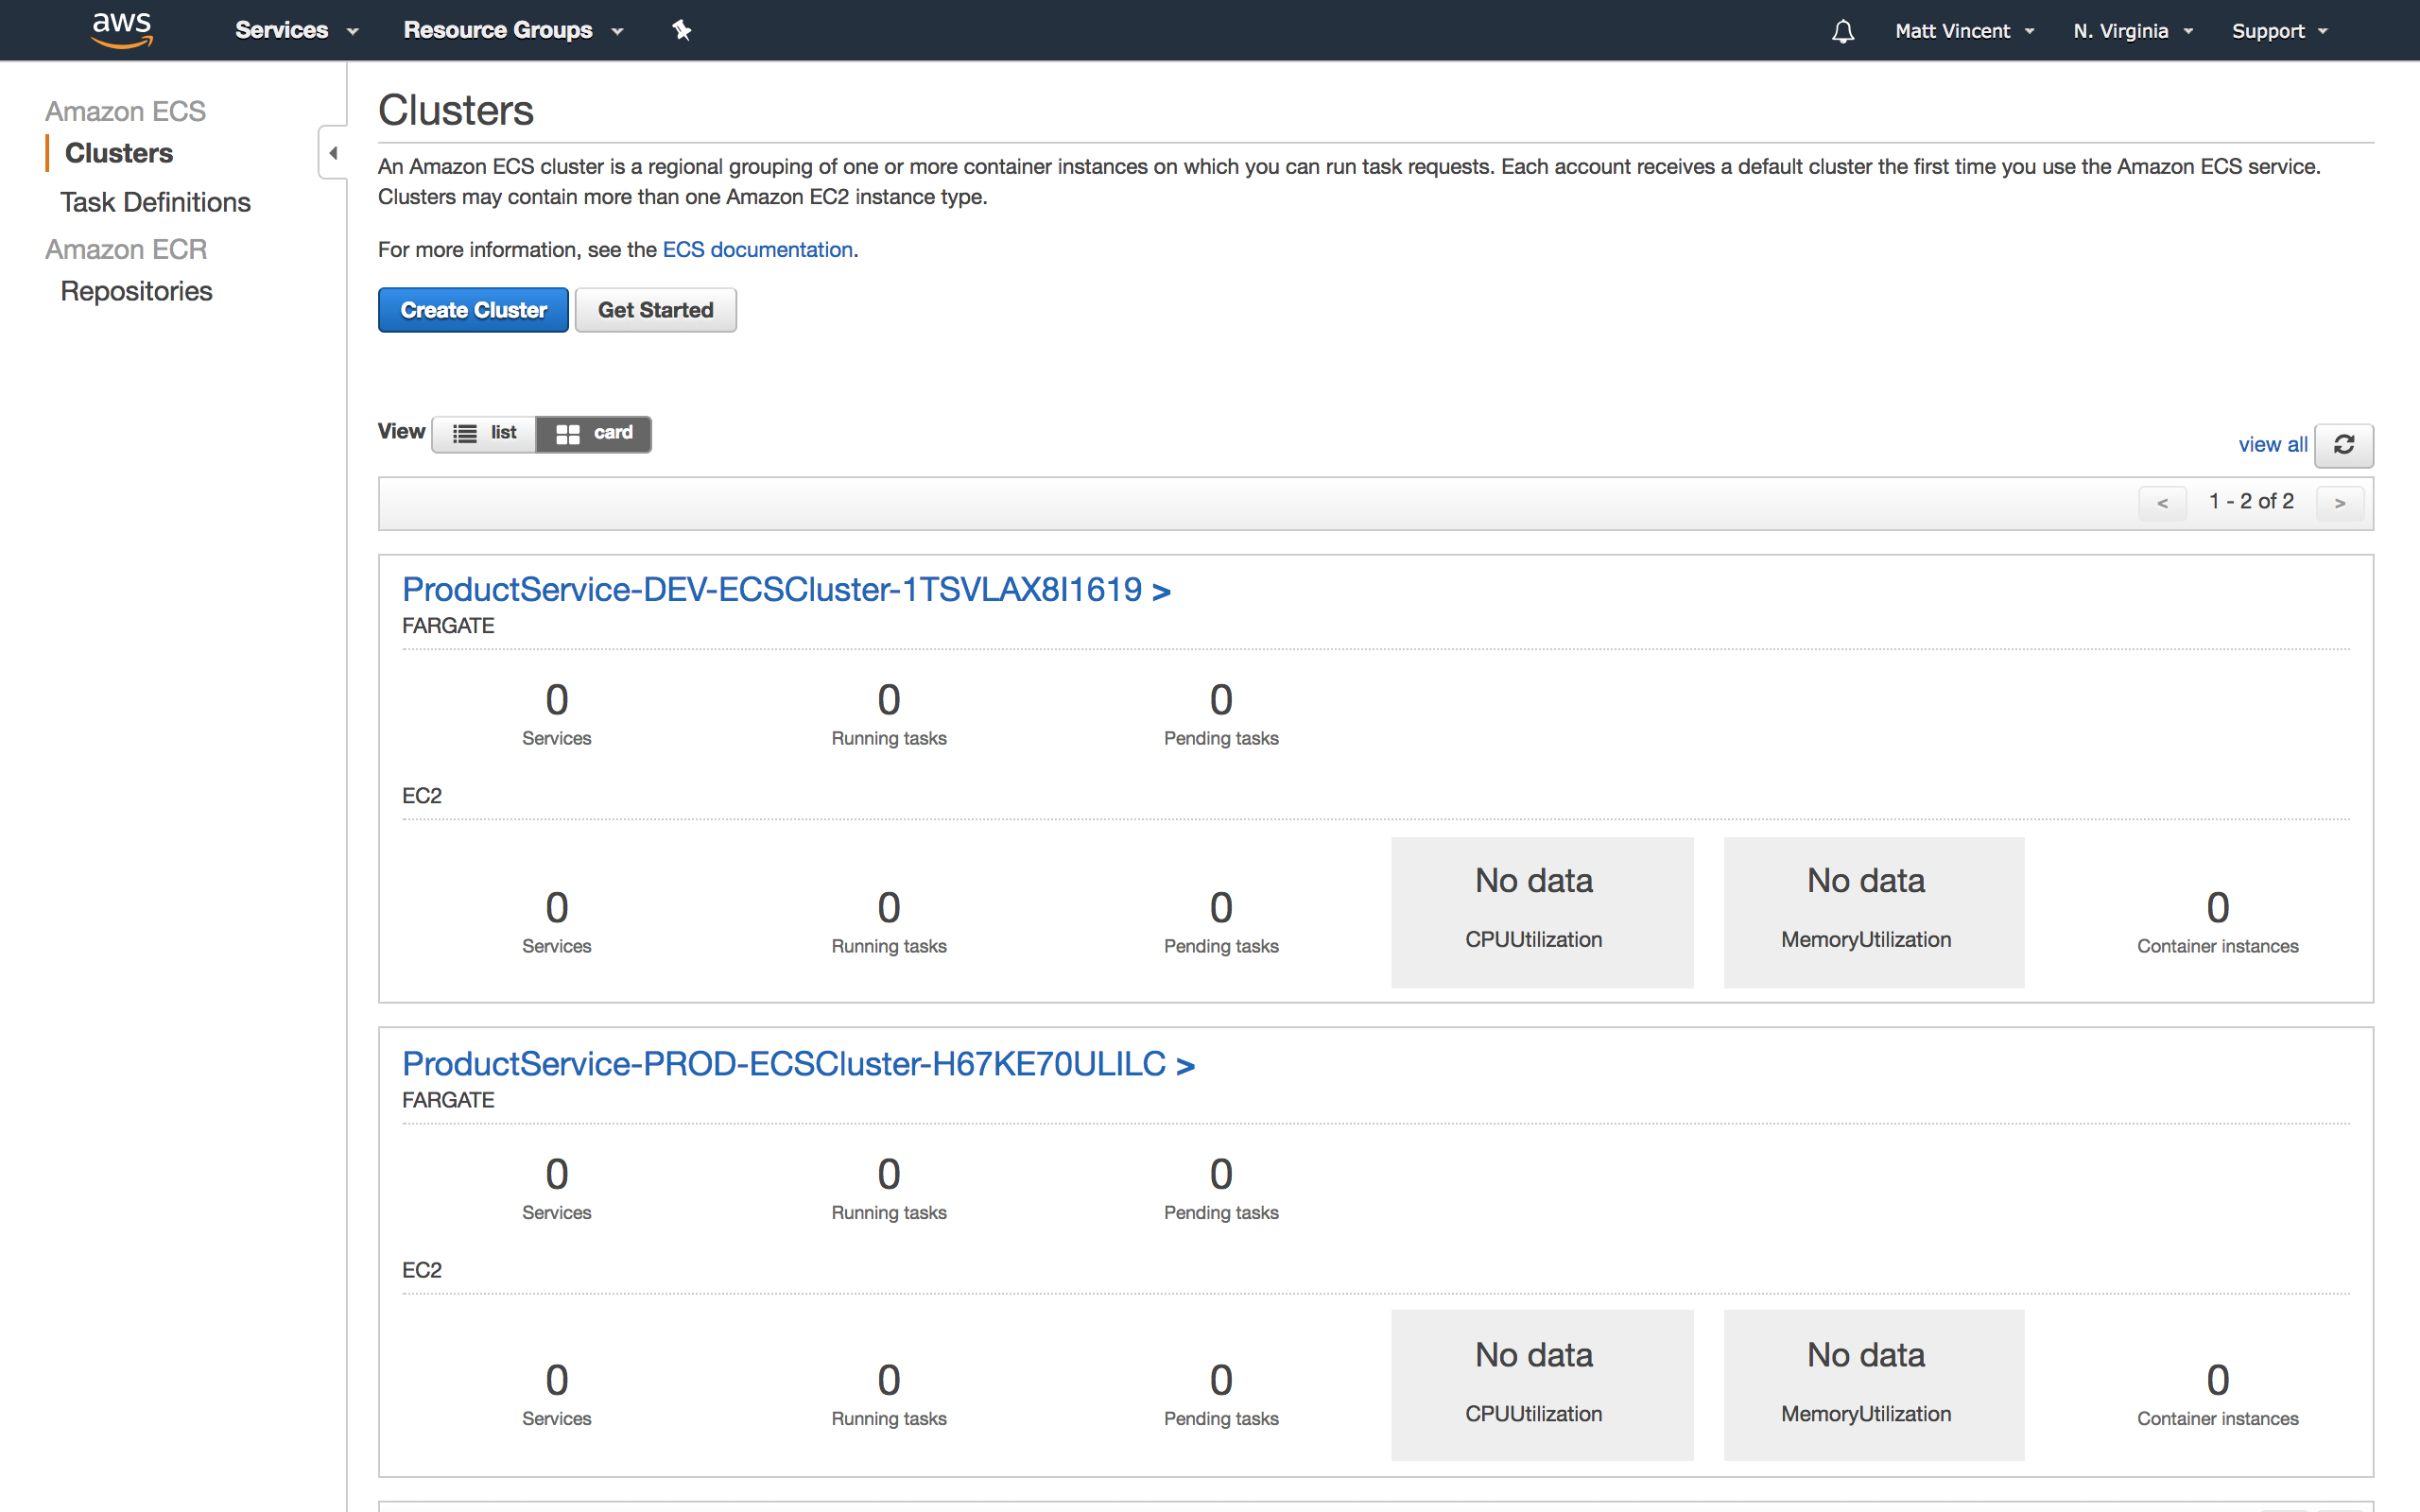
You should see two new stacks get created.

These stacks create your Dev and Prod ECS Clusters.
And your CodePipeline is now four stages long (You may need to refresh).
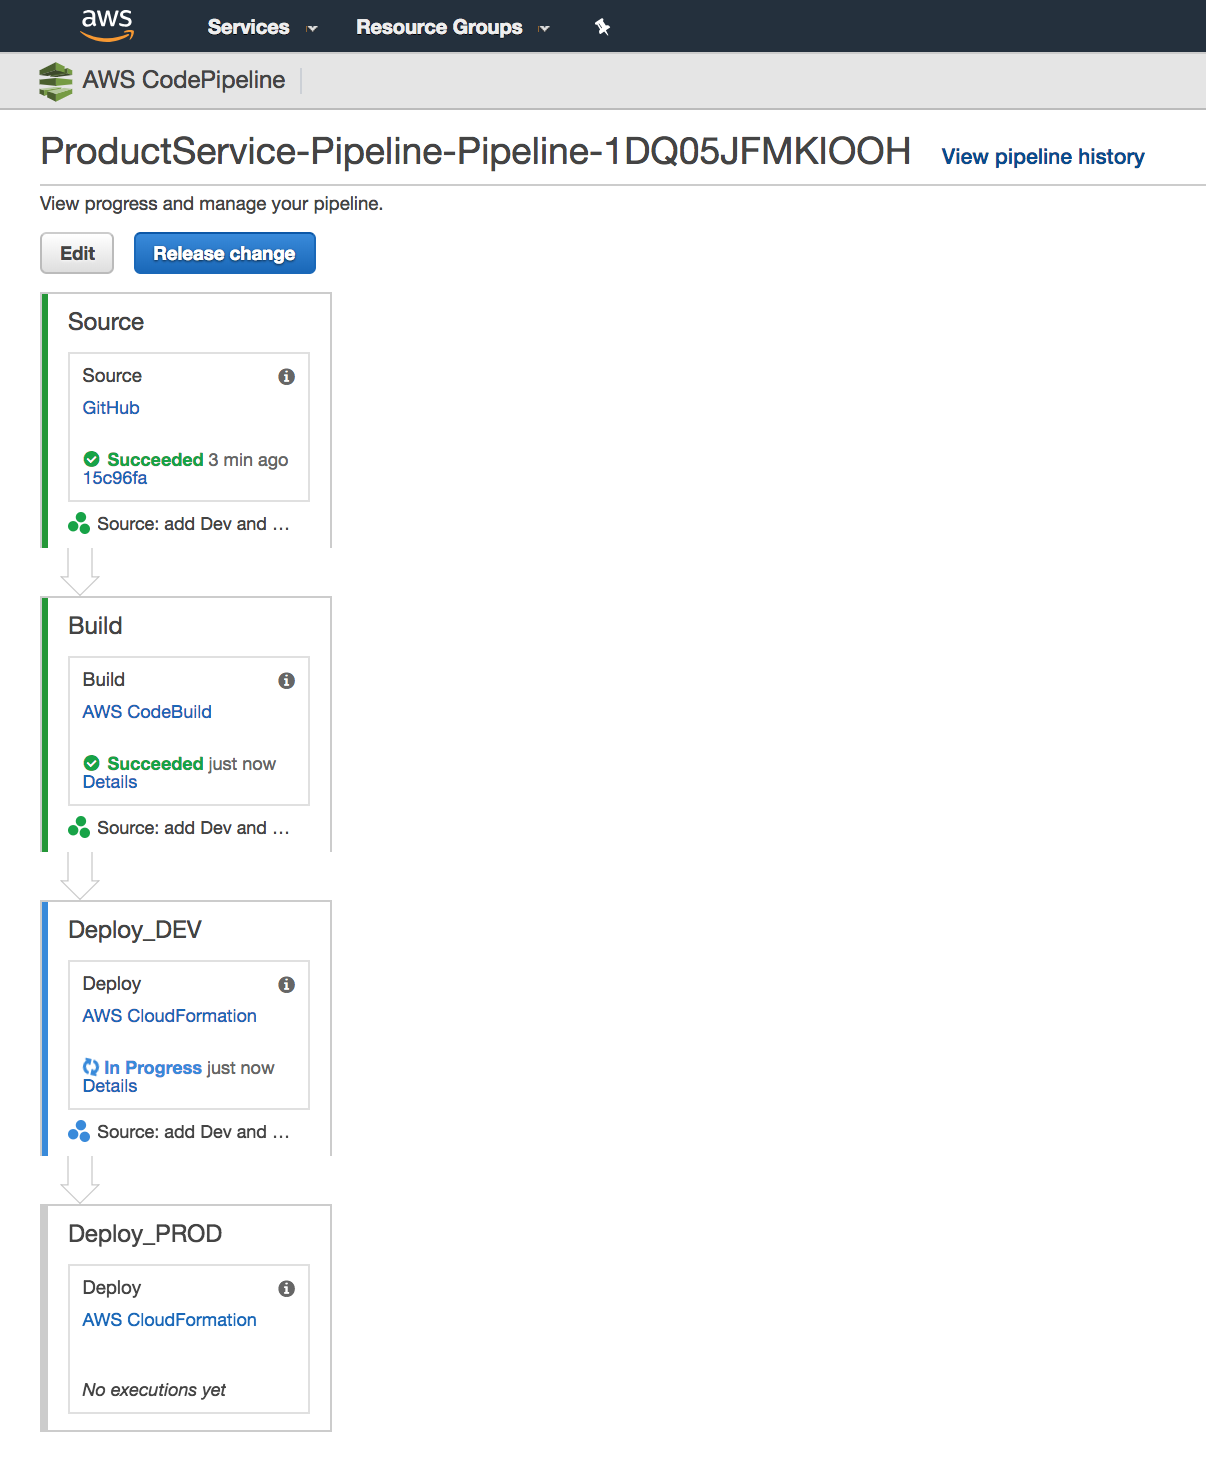
(If you update the stack before checking in the template you will probably see a failure in the pipeline that it can not find the template file).
We now have a continuous delivery pipeline in place that will ensure that infrastructure changes are kept consistent between source control, Dev and Prod!
Important Note For simplicity of this blog series, we are configuring multiple environments inside of a single AWS account. However, we very strongly recommend setting up an AWS account per environment{:target="_blank"} in practice. It's a seemingly counter-intuitive approach, but there are countless benefits to doing so that are beyond the scope of this series.
Accessing Your Fargate App
Next we need to get your application running and accessible. There are three main pieces to this: a Task Definition{:target="_blank"}, a Service{:target="_blank"} and an Application Load Balancer{:target="_blank"} (also known as a LoadBalancerV2{:target="_blank"}). The Task Definition is responsible for telling ECS{:target="_blank"} how to launch your application. This includes CPU and memory settings as well as an IAM role{:target="_blank"} that will be assumed by the task. Add these resources to your cloudformation.template.yml file:
# This is the role that our task will excute as. You can think of this as the ECS equivilent of an instnace profile.
TaskRole:
  Type: "AWS::IAM::Role"
  Properties:
    AssumeRolePolicyDocument:
      Version: "2012-10-17"
      Statement:
        # Allow ECS the ability to assume this role.
        - Effect: "Allow"
          Action: "sts:AssumeRole"
          Principal:
            Service: "ecs-tasks.amazonaws.com"
    ManagedPolicyArns:
      # We need to be able to pull our docker image. If your docker repo is in the same account this policy will do it.
      # If you are deploying accross accounts you could remove this and instead ensure that your repo is readable by this role
      - arn:aws:iam::aws:policy/AmazonEC2ContainerRegistryReadOnly
TaskPolicy:
  # This is an additional policy we are going to attach to our role.
  # We can add additional one-off grants here to allow our container to only access the AWS resources it needs.
  Type: "AWS::IAM::Policy"
  Properties:
    PolicyName: !Sub "${AWS::StackName}-TaskPolicy"
    Roles:
      - !Ref TaskRole
    PolicyDocument:
      Version: "2012-10-17"
      Statement:
        # Allow the task to forward to Cloudwatch logs. (anything we send to stdout or stderr will go there)
        - Effect: "Allow"
          Action:
            - logs:*
          Resource: !GetAtt LogGroup.Arn
# Create a place for logs to go.
LogGroup:
  Type: "AWS::Logs::LogGroup"
  Properties:
    RetentionInDays: 30
# This defines the resources we need for our Task to execute
TaskDefinition:
  Type: "AWS::ECS::TaskDefinition"
  DependsOn:
    # We need a depends on here because without it the task may attempt to start before the policy is attached to the role.
    - TaskPolicy
  Properties:
    Cpu: 256 #This is 25% of a "vCPU", the smallest amount we can allocate
    Memory: 512 #This is 512MB, the smallest amount we can allocate
    ExecutionRoleArn: !GetAtt TaskRole.Arn
    TaskRoleArn: !GetAtt TaskRole.Arn
    # These next two properties are the only Fargate specific configuration in the TaskDefinition.
    # It forces an 'awsvpc' network mode
    NetworkMode: awsvpc
    RequiresCompatibilities:
      - FARGATE
    ContainerDefinitions:
      - Name: ProductService
        PortMappings:
          - ContainerPort: 3000
        Essential: true
        Image: !Ref Image
        LogConfiguration:
          # This tells ECS to send log output to Cloudwatch. The prefix is required by Fargate so don't remove it.
          LogDriver: "awslogs"
          Options:
            awslogs-group: !Ref LogGroup
            awslogs-region: !Ref AWS::Region
            awslogs-stream-prefix: ProductService
There is a difference between the way traditional ECS tasks and Fargate tasks obtain IP addresses and communicate with the network. Traditionally, the Docker daemon on the host machine creates a private internal network and issues IP addresses from that network to the containers running on the host. Traffic bound for the wider network is NATed{:target="_blank"} out on the host's network interface. With Fargate however, this process changes. ECS actually obtains a new IP address directly from the configured subnet and attaches it directly to the Docker container. This means that the IP address the container sees for itself is actually routable from the wider VPC{:target="_blank"}. Unfortunately, as of right now, there are some issues resolving this address by doing a hostname lookup inside the container. See this article{:target="_blank"} to learn more on this topic.
The ECS Service{:target="_blank"} governs the execution and placement of a "Task." This is the resource that will handle ensuring the correct number of instances are running. It will handle rolling deployments{:target="_blank"} to ensure no-downtime deployments. It also manages the LoadBalancerV2{:target="_blank"}'s list of targets so that requests are routed only to healthy instances.
Because the Load Balancer connects to the network in which these instances execute, we need to specify two new parameters in our CloudFormation template and populate them. Add these to the "Parameters" section of your cloudformation.template.yml:
VpcId:
  Type: AWS::EC2::VPC::Id
  Description: Id of the VPC
SubnetIds:
  Type: List<AWS::EC2::Subnet::Id>
  Description: List of subnet Ids to run in
If you created your AWS account after 2013-12-04, you should already have a default VPC and subnet configured. You can get your default VpcId and SubnetIds by running the following commands:
aws ec2 describe-vpcs
aws ec2 describe-subnets
If you don't have a default VPC, or want to create your own Internet Gateway, VPC and public/private subnets, you can run these AWS CLI commands to create them and capture the corresponding VpcId and SubnetIds for your cloudformation.template.yml stack: (This template expects the region to have 4 or more availability zones and will not work in regions such as us-east-2 which has 3 availability zones. Check the availability zones in your region with the following command: aws ec2 describe-availability-zones --region your-region):
git clone git@github.com:sourceallies/aws-cf-templates.git
cd aws-cf-templates/
aws cloudformation deploy --stack-name=ProductService-VPC  --template-file=vpc/vpc-4azs.yaml --parameter-overrides ClassB=199
aws cloudformation describe-stacks --stack-name ProductService-VPC --query 'Stacks[0].Outputs[?(OutputKey==`VPC` || OutputKey==`SubnetAPublic`  || OutputKey==`SubnetBPublic` || OutputKey==`SubnetCPublic` || OutputKey==`SubnetDPublic`) ].OutputValue' --output text
Update the parameters/dev.params.json and parameters/prod.params.json with the appropriate values for these parameters.
Here is an example:
{
    "Parameters": {
        "VpcId": "vpc-aba65202",
        "SubnetIds": "subnet-7dfd270b,subnet-d89ddebd,susdet-ef42c9e3,subnet-1fd84335,subnet-dd1a49e0,subnet-a0fa9bf8",
        "Image": "RELEASE_IMAGE_URL"
    }
}
Note that the "SubnetIds" parameter is a comma-separated list and not a JSON array. Also, remember to leave the "RELEASE_IMAGE_URL" unchanged so that our buildspec.yml file can replace it at build time.
With these networking settings now available in our template we can add the Service resource to cloudformation.template.yml:
Service:
  Type: "AWS::ECS::Service"
  Properties:
    Cluster: !Ref ECSCluster
    # This is new with fargate (obviously)
    LaunchType: FARGATE
    # The number of instances we would like to run
    DesiredCount: 1
    # The task to execute
    TaskDefinition: !Ref TaskDefinition
#    We haven't setup a load balancer yet so this part is commented out.
#    The Service references the loadbalancer rather than the other way around
#    LoadBalancers:
#      - ContainerName: ProductService
#        ContainerPort: 3000
#        TargetGroupArn: !Ref TargetGroup
    NetworkConfiguration:
      AwsvpcConfiguration:
        AssignPublicIp: ENABLED
        Subnets: !Ref SubnetIds
#        SecurityGroups:
#          - !Ref AppSG
    # This is optional (These are the default values)
    DeploymentConfiguration:
      MinimumHealthyPercent: 100 #Never allow less than this percentage of servers to be running during a deploy
      MaximumPercent: 200 # Allow double the number of servers to be running during a deployment
Update your CloudFormation stack by checking in cloudformation.template.yml and the parameter files.
You can see the changes we made.
Wrap Up
When CodePipeline sees your change and deploys it you should have a running service with one task. In the next blog article in this series, we will front this service with a load balancer.
Table of Contents
- Introduction
- Unit Testing
- Koa
- Docker
- Cloudformation
- CodePipeline
- Fargate (this post)
- Application Load Balancer
- HTTPS/DNS
- Cognito
- Authentication
- DynamoDB
- Put Product
- Validation
- Smoke Testing
- Monitoring
- List Products
- Get Product
- Patch Product
- History Tracking
- Delete
- Change Events
- Conclusion
If you have questions or feedback on this series, contact the authors at nodereference@sourceallies.com.