Sharing Our Passion for Technology
& Continuous Learning
So you've discovered the wonderful world of Docker and are running containers left and right. You can effortlessly spin up any application under the sun and browse it locally. What more could a techie want in their home server hosting environment?
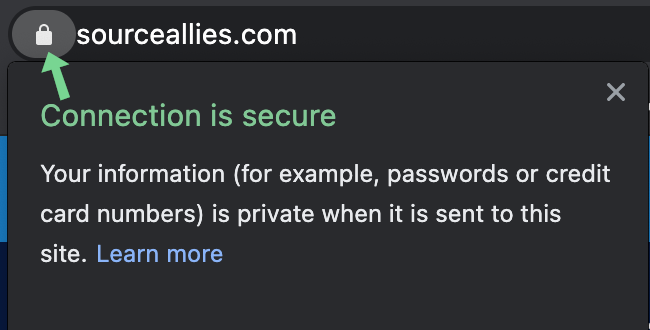
That HTTPS Padlock showing you’re a secure web site is a must-have for internet-facing non-static Docker applications these days.
Let’s go through how to get HTTPS certificates for free in Docker without much setup or maintenance. My tools of choice to accomplish this are a registered domain with API support and a Traefik 2.4 proxy container, which supports LetsEncrypt; LetsEncrypt then leverages the domain provider’s API to prove you own your domain and issue certificates for free!
There are other ways to prove you own the domain to LetsEncrypt besides DNS APIs but I find this to be the easiest, most flexible, and most universal. Other approaches require either port 80 or 443 to be routed to your host prior to requesting or renewing certificates. That’s not a requirement for DNS challenges, so they support non-internet-facing applications. Hostnames LetsEncrypt issues certificates for are public record however, even for non-internet-facing certificates.
This guide is tailored towards a home lab or home server environment. Some domain, network firewall/port forwarding, and Docker knowledge is assumed of the audience. Most of the detail in this post will focus on Traefik and Docker. There are alternatives to Traefik for reverse proxies with LetsEncrypt support - this is just my preferred setup.
If you're interested in Docker but this sounds advanced, Ben has you covered with his Dockerize Your Dev Environment post which explains Docker's fundamentals.
Required Tools / Knowledge
A domain is required to get a ‘real’ certificate from LetsEncrypt. It can’t issue a certificate for 192.168.1.2 or a made-up local domain you might use internally at home, unfortunately. Luckily, domains are relatively cheap at around $10 a year. The certificates used to cost extra on top of that $10 domain registration cost but since LetsEncrypt started handing out free certs, they forced other SSL providers to stop overcharging for essential certificates for encrypting traffic of websites.
An internet routable public IP address will be required so you can point your domain at it. If you have a dynamic IP address that’s OK, but you may want to run a dynamic dns client container to automate IP change updates.
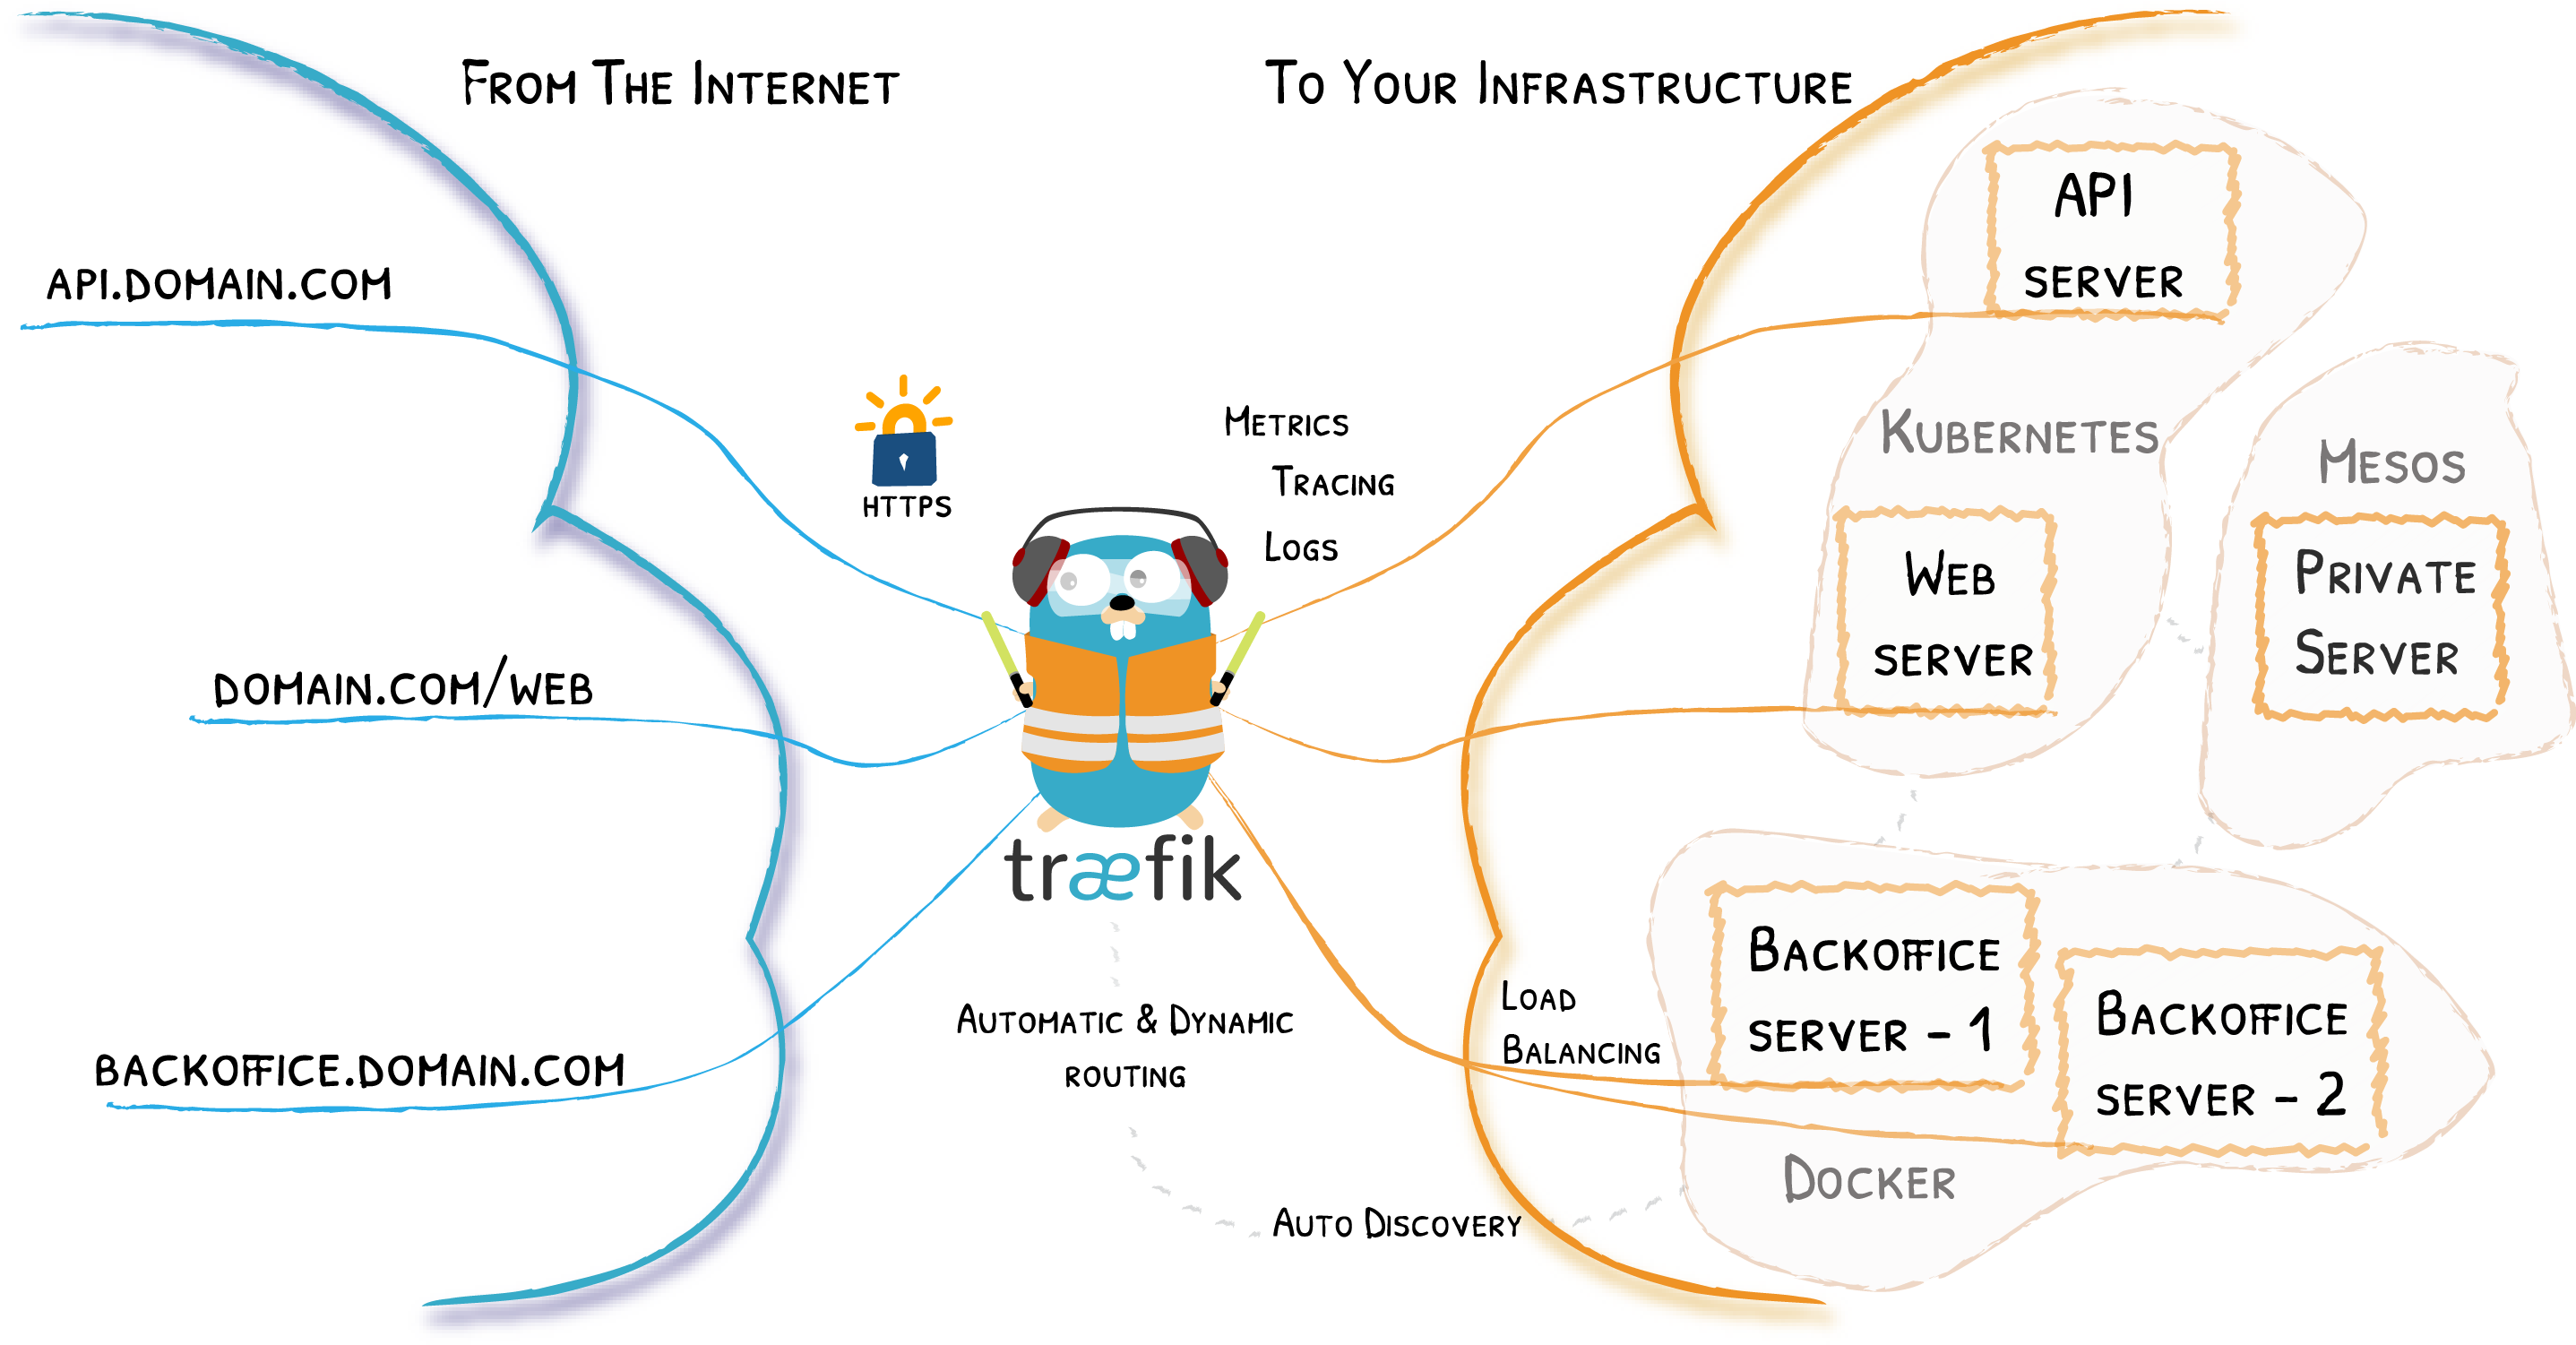
Traefik is a reverse proxy that speaks with Docker containers natively. A container can tell Traefik if and how it wants to be proxied through a domain; and in our case if it wants an SSL certificate and HTTP redirected to HTTPS. So think NGINX/Apache with SSL generation+requests built-in AND discovery of new containers which need new rules or certificates fully automated. That is totally epic if you have ever had to do this the old way.
Lastly you'll need Docker and Docker Compose. I find docker-compose meets my needs perfectly fine and is one of the best ways to share Docker containers on the internet, so we’ll be using docker-compose YAML examples in our step by step instructions next.
Step by Step
1. DNS and Network Setup.
Go to your domain’s registrar/DNS configuration and point a test hostname to the IP address where you’re hosting Docker from. If you have a Dynamic DNS setup then point to that hostname instead of your IP directly.
In your home firewall/router, you’ll want to port forward 443 (and optionally 80 for HTTP to HTTPS) to your Docker host. I’m glossing over details here since there are a million network routers interfaces and domain registrars to choose from so there’s not much point in going into detail since I can’t possibly cover them all.
2. Get your DNS API key for Traefik to use.
While you’re logged into your registrar (again, hopefully you picked one that is supported by Traefik’s LetsEncrypt DNS integration) be sure to grab the API key for remote controlling DNS entries since we’ll be doing a DNS Challenge to prove we own our domain. Some DNS providers require you to add and approve an IP address to access their API too.
3. Traefik Configuration and Startup
Next we’ll want to use a docker-compose.yaml that looks like this:
version: '3'

services:
  reverse-proxy:
    image: traefik:v2.4
    container_name: "traefik"
    command:
      #- "--log.level=DEBUG"  # If you run into trouble
      - "--api.insecure=true"
      - "--providers.docker=true"
      - "--providers.docker.exposedbydefault=false"
      - "--entrypoints.http.address=:80"
      - "--entrypoints.https.address=:443"
      - "--certificatesresolvers.myresolver.acme.email=${LE_EMAIL}"
      - "--certificatesresolvers.myresolver.acme.dnschallenge.provider=namecheap"
      - "--certificatesResolvers.myresolver.acme.storage=/certs/acme.json"
      # To avoid rate limits https://letsencrypt.org/docs/rate-limits/
      # when testing it is recommended to use the staging server (issues an invalid cert, but works for testing)
      # - "--certificatesResolvers.myresolver.acme.caServer=https://acme-staging-v02.api.letsencrypt.org/directory"
    ports:
      - "80:80"      # The HTTP port for internal or http to https redirection
      - "443:443"    # HTTPS traffic
      - "8080:8080"  # The Web UI (enabled by --api.insecure=true)
    volumes:
      - ./certs/:/certs/
      - /var/run/docker.sock:/var/run/docker.sock
      - /etc/localtime:/etc/localtime:ro
    environment:
      # REQUIRED key=value format in .env file,
      # Don't set here if you plan on commiting/pushing
      # .gitignore .env and /certs/ for security if you do
      - NAMECHEAP_API_USER  # Change to whichever variable(s) your provider uses
      - NAMECHEAP_API_KEY   # Change to whichever variable(s) your provider uses
      - YOURDOMAIN
      - LE_EMAIL
    networks:
      - proxy

networks:
  proxy:
    external: true
Don’t run docker-compose up quite yet, we’ll need to create a docker network and set up the environment variables correctly first.
docker network create proxy will create a network to act as a bridge between multiple docker-compose files since keeping every web application in one file is unrealistic.
The API key (and sometimes username) from the previous step needs to be plugged into an environment variable which has a variable name based on your domain provider. I’m using Namecheap’s variables in this example but you’ll use whichever provider you use, for example Digital Ocean or Cloud Flare.
Remember, this API Key is a secret, so make sure you're not committing this code to a public git repository. I recommend using Docker Compose’s support of an .env file for secrets. Any environment variables in your docker-compose.yaml which don’t have values will have their value pulled from the .env file instead. Adding .env to your .gitignore file makes it a great place for secrets! Here’s an example of what .env might look like for our above configuration.
NAMECHEAP_API_USER=docker_ssl_traefik_example
NAMECHEAP_API_KEY=abdefghijklmnopqrstuvwxyz
YOURDOMAIN=yourdomain.tld
LE_EMAIL=me@yourdomain.tld
4. Start up a web application which uses your DNS name from Step 1
This step requires any web app Docker image, we’re using a simple one that just shows one page to accomplish demoing working HTTPS but this can be literally anything. Traefik is it’s own separate docker-compose / stack from this one in order to allow you to set up as many unrelated webapps to the internet through traefik as you need.
version: '3'

services:
  whoami:
    # A container that exposes an API to show its IP address
    image: traefik/whoami
    environment:
      - YOURDOMAIN  # assign here or in .env
    labels:
      traefik.enable: "true"
      traefik.docker.network: "proxy"
      traefik.http.middlewares.whoami-https-redirect.redirectscheme.scheme: "https"
      traefik.http.routers.whoami-https.entrypoints: "https"
      traefik.http.routers.whoami-https.rule: "Host(`ip.${YOURDOMAIN}`)"
      traefik.http.routers.whoami-https.service: "whoami"
      traefik.http.routers.whoami-https.tls: "true"
      traefik.http.routers.whoami-https.tls.certresolver: "myresolver"
      traefik.http.routers.whoami.entrypoints: "http"
      traefik.http.routers.whoami.middlewares: "whoami-https-redirect"
      traefik.http.routers.whoami.rule: "Host(`ip.${YOURDOMAIN}`)"
      traefik.http.services.whoami.loadbalancer.server.port: "80"  # Set to container's web port
    networks:
      - proxy

networks:
  proxy:
    external: true
Set YOURDOMAIN in .env, docker-compose up, and that’s all! The labels on the container will tell Traefik to automatically route that hostname traffic to your container and handle all of the requests for certificate generation and renewal. This may take a minute or two. If you have issues, double check your prior steps, the errors in the Traefik container logs should tell you what went wrong, or inspect the Traefik dashboard at http://YOURIP:8080.
When you want to add more containers to Traefik you can use the same labels as above modified slightly. Replace ‘whoami’ with your new container’s unique identifier. Traefik will error out if you have duplicate routers or services.
Conclusion
Another bonus, when using the LetsEncrypt DNS challenge method you can also do wildcards so everything under *.yourdomain.tld can have SSL if needed. This wildcard flexibility and ease of just plugging in API keys is why I prefer DNS challenges for LetsEncrypt for my home HTTPS. This allows you to get a certificate without having to worry about other domain verification challenge methods which require the domain to be exposed over port 80/443 first.
You now have a Traefik web proxy that generates free SSL certificates for as many container applications as you want to plug into it - internal or external to your LAN. Enjoy your automatically renewing free certificates!